
Recently I was working on one application development. I want to develop a hybrid video player application. So that with single source code I can develop an application for Web, Android, and iOS. So for this purpose, I have chosen Ionic.
Ionic is a popular cross-platform application development framework. It allows us to develop a mobile, web app and PWA just using single source code.
The major advantage of Ionic is that we can develop these applications just by using javascript.
We can use popular frontend frameworks like Angular, React or VueJS or even no framework at all with vanilla JavaScript to develop an angular app. So to develop Ionic we don’t require to learn new device-specific technology.
Ionic Native makes it easy to add native device functionality to any Ionic app leveraging Cordova or Capacitor.
In the Ionic application, we have two plugins to play a video in native devices.
- Cordova Video Player Plugin (@ionic-native/video-player)
- Capacitor Video Player Plugin (capacitor-video-player)
Cordova and Capacitor are both used for accessing native device functionality. But nowadays capacitor is the preferred foundation over Cordova for developing hybrid apps. It is not only used to develop an application for native devices like Android and iOS, but it also provides first-class Electron and Progressive Web App (PWA) Support
Moreover, Capacitor is developed by the same team that developed the Ionic framework.
The capacitor has other advanced features over Cordova. Read this article for more details.
So keeping all this in mind,
In this article, we will develop an Ionic Video Player App for Mobile and Web using Capacitor Video Player Plugin.
Let’s start with initial application setup.
If you want to add a video player in your existing ionic application then you can skip the following step.
Create a new Ionic Project
To create a new ionic project we will require the Ionic CLI. You can install it using the below command.
npm install -g @ionic/cli
Once it is installed create a new Ionic project using below command :
ionic start < your_project_name >
This command will ask you for below inputs
- Framework ?: In this app we will use Angular framework. You can can other option like React.
- Predefined Starter Template? : In this app, I have used
listtemplate, You can select any predefined template or blank template based on your requirement. - Integrate your new app with Capacitor for integration with Android and iOS? : In this application, we will use capacitor plugins so we will enter
yfor this. This will install@capacitor/corepackage and@capacitor/clipackage
Once a project is successfully created it will show a message to serve an application using ionic serve
Note: In your existing project if a capacitor is not installed then you can install it using below commands :
npm install -D @capacitor/core
npm install -D @capacitor/cli
Create a Data Service
We will create a sample DataService in data.service.ts file which will provide us a video list.
import { Injectable } from '@angular/core';

export interface Video {
  title: string;
  url: string;
  thumb: string;
  subtitle: string;
}

@Injectable({
  providedIn: 'root'
})
export class DataService {
  private videos: Video[] = [
    {
      url: "https://commondatastorage.googleapis.com/gtv-videos-bucket/sample/BigBuckBunny.mp4",
      subtitle: "By Blender Foundation",
      thumb: "https://commondatastorage.googleapis.com/gtv-videos-bucket/sample/images/BigBuckBunny.jpg",
      title: "Big Buck Bunny"
    },
    {
      url: "https://commondatastorage.googleapis.com/gtv-videos-bucket/sample/ElephantsDream.mp4",
      subtitle: "By Blender Foundation",
      thumb: "https://commondatastorage.googleapis.com/gtv-videos-bucket/sample/images/ElephantsDream.jpg",
      title: "Elephant Dream"
    },
    ...
  ];

  constructor() { }

  public getVidoes(): Video[] {
    return this.videos;
  }

}
Show Video List on Page
Now we will fetch the video list from DataService and render it on page. Here I will show it on HomePage .
import { Component } from '@angular/core';
import { DataService, Video } from '../services/data.service';

@Component({
  selector: 'app-home',
  templateUrl: 'home.page.html',
  styleUrls: ['home.page.scss'],
})
export class HomePage {
  videos: Video[];

  constructor(private data: DataService) {
    this.videos = data.getVidoes();
  }

}
<ion-header [translucent]="true" >
  <ion-toolbar color="primary">
    <ion-title>
      NG Video Player
    </ion-title>
  </ion-toolbar>
</ion-header>

<ion-content [fullscreen]="true">
  <ion-list>
    <ion-item *ngFor="let v of videos">
      <ion-avatar slot="start">
        <img [src]="v.thumb" />
      </ion-avatar>
      <ion-label>{{v.title}}</ion-label>
      <ion-button slot="end" fill="clean" size="large">
        <ion-icon name="play-circle-outline"></ion-icon>
      </ion-button>
    </ion-item>
  </ion-list>
</ion-content>
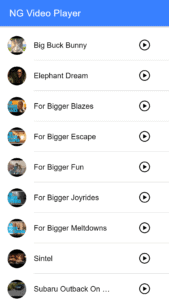
Ones above setup is done our initial app will look like as below :
Install capacitor-video-player plugin using below command :
npm install --save capacitor-video-player@latest
Now we will use capacitor-video-player as below on HomePage to play a video.
import { Plugins } from '@capacitor/core';
import * as PluginsLibrary from 'capacitor-video-player';
const { CapacitorVideoPlayer, Device } = Plugins;

import { Component, AfterViewInit } from '@angular/core';
import { DataService, Video } from '../services/data.service';

@Component({
  selector: 'app-home',
  templateUrl: 'home.page.html',
  styleUrls: ['home.page.scss'],
})
export class HomePage implements AfterViewInit {
  videoPlayer: any;
  videos: Video[];

  constructor(private data: DataService) {
    this.videos = data.getVidoes();
  }

  async ngAfterViewInit() {
    const info = await Device.getInfo();
    if (info.platform === "ios" || info.platform === "android") {
      this.videoPlayer = CapacitorVideoPlayer;
    } else {
      this.videoPlayer = PluginsLibrary.CapacitorVideoPlayer
    }
  }

  async play(url: string) {
    document.addEventListener('jeepCapVideoPlayerPlay', (e: CustomEvent) => { console.log('Event jeepCapVideoPlayerPlay ', e.detail) }, false);
    document.addEventListener('jeepCapVideoPlayerPause', (e: CustomEvent) => { console.log('Event jeepCapVideoPlayerPause ', e.detail) }, false);
    document.addEventListener('jeepCapVideoPlayerEnded', (e: CustomEvent) => { console.log('Event jeepCapVideoPlayerEnded ', e.detail) }, false);
    const res: any = await this.videoPlayer.initPlayer({ mode: "fullscreen", url: url });
  }
}
We will make the following changes in HomePage Component to play a video from URL in web and mobile devices.
- Import Capacitor Plugins and Capacitor Video Player on top of the component.
- Create a reference for
CapacitorVideoPlayertovideoPlayerobject to use it to play video. We will assignCapacitorVideoPlayerplugin based on the type of platform. - We can get the platform details using
Device.getInfo()method. This method will give use device information like device name, model, platform, app version, UUID, operating system, os version, manufacturer, memory used, free disk, total disk size, etc. - We will create a
play()method that has a video URL as input. On click of play button we will call this method. - To play a video, we need to initialize a video player with
optionswe can do that withherevideoPlayer.initPlayer(options).optionshas two properties mode and URL.- mode : it can be
'fullscreen'or'embedded', (embedded is only for web) - URL : is the video URL, it should be https URL for files from the web or you can use file path from the local file system. for IOS
"public/assets/video/video.mp4". for Android"/raw/video"without the type. You have to create manually a raw folder under theresfolder of your app and copy the video file in it . for Web"assets/video/video.mp4"
- mode : it can be
Capacitor Video Player has the following events for web plugin.
jeepCapVideoPlayerPlay: Emitted when the video starts to playjeepCapVideoPlayerPause: Emitted when the video is pausedjeepCapVideoPlayerPlaying: Emitted when the video restart to playjeepCapVideoPlayerEnded: Emitted when the video has ended
Capacitor Video Player also provides following methods for web plugin only.
play(options): Play the videopause(options): Pause the videogetDuration(options): Get the duration of videosetVolume(options): Set the volume of videogetVolume(options): Get the volume of videosetMuted(options): Set the Muted Parameter of videogetMuted(options): Get the Muted Parameter of videosetCurrentTime(options): Set the current time to play video from that time.getCurrentTime(options): Get the current time of the video.
It’s done !!! It is ready for the web.
To use it in the native device we need to create a bundle for that platform type. Here we will create a native package for Android. The same way you can generate a native package for iOS.
Before we create an android bundle (native package) update the appId in capacitor.config.ts file. appId is The package name for Android and the bundle identifier for iOS.
- Ionic Build:
ionic build --prod. - If an android package is not created before, execute
npx cap add android. This will- Install android dependencies
- Add a native android project in our project
- Sync Gradle files
- Create an android package with all required files
- Copy the ionic build files from
wwwtoandroid\app\src\main\assets\public - Copy native bridge
- Copy
capacitor.config.ts - Update the capacitor plugins
- Update the android package.
Once the above commands are executed it will show the following message.
Now you can run npx cap open android to launch Android Studio.
Using this command we will open an android project in the Android Studio where we can test it on AVD. We can also generate APK there.
Note: It is not required to create an android package for each ionic build. We can do all the above steps in just one command.
npx ionic cap run android
This command will create the ionic build, copy the www files to the android package and open the android studio.
Awesome ✨!!! Our android application is ready to launch 🚀🚀🚀.
import { Plugins } from '@capacitor/core';
import * as PluginsLibrary from 'capacitor-video-player';
const { CapacitorVideoPlayer, Device } = Plugins;

import { Component, AfterViewInit } from '@angular/core';
import { DataService, Video } from '../services/data.service';

@Component({
  selector: 'app-home',
  templateUrl: 'home.page.html',
  styleUrls: ['home.page.scss'],
})
export class HomePage implements AfterViewInit {
  videoPlayer: any;
  videos: Video[];

  constructor(private data: DataService) {
    this.videos = data.getVidoes();
  }

  async ngAfterViewInit() {
    const info = await Device.getInfo();
    if (info.platform === "ios" || info.platform === "android") {
      this.videoPlayer = CapacitorVideoPlayer;
    } else {
      this.videoPlayer = PluginsLibrary.CapacitorVideoPlayer
    }
  }

  async play(url: string) {
    document.addEventListener('jeepCapVideoPlayerPlay', (e: CustomEvent) => { console.log('Event jeepCapVideoPlayerPlay ', e.detail) }, false);
    document.addEventListener('jeepCapVideoPlayerPause', (e: CustomEvent) => { console.log('Event jeepCapVideoPlayerPause ', e.detail) }, false);
    document.addEventListener('jeepCapVideoPlayerEnded', (e: CustomEvent) => { console.log('Event jeepCapVideoPlayerEnded ', e.detail) }, false);
    const res: any = await this.videoPlayer.initPlayer({ mode: "fullscreen", url: url });
  }
}
<ion-header [translucent]="true" >
  <ion-toolbar color="primary">
    <ion-title>
      NG Video Player
    </ion-title>
  </ion-toolbar>
</ion-header>

<ion-content [fullscreen]="true">
  <ion-list>
    <ion-item *ngFor="let v of videos">
      <ion-avatar slot="start">
        <img [src]="v.thumb" />
      </ion-avatar>
      <ion-label>{{v.title}}</ion-label>
      <ion-button slot="end" fill="clean" size="large" (click)="play(v.url)">
        <ion-icon name="play-circle-outline"></ion-icon>
      </ion-button>
    </ion-item>
  </ion-list>
</ion-content>
Now We can test our application on the web using ionic serve and test android package in Android Studio with Sample AVD.
https://github.com/ngdevelop-tech/ionic-capacitor-video-player-example
If you like the project please mark the ⭐ in the Github repository.
In this article, we have seen how to build an ionic video player application for mobile and web using a capacitor video player plugin.
I hope you like this article, provide your valuable feedback and suggestions in below comment section🙂.
For more updates, Follow us 👍 on NgDevelop Facebook page.