
Angular Routing & Navigation
Angular Routing is the mechanism to navigate between different component view.
Till now, whenever we need to display component on the screen, we are using the selector of that particular component on parent component called AppComponent.
In this chapter, we will add following things :
- The ability to navigate between
ProductsComponent,AddProductModelComponentandAddProductTemplateComponent. - On the successful addition of the
productinAddProductModelComponentandAddProductTemplateComponent, navigate toProductsComponent. - Navigation Bar in the Header Section of page
So let’s start by adding an ability to navigate between components.
Angular gives the @angular/router library to work with the routing ability. We will use RouterModule and Routes of @angular/router to configure the routes.
An Angular best practice is to load and configure the router in a separate, top-level module that is dedicated to routing and imported by the root
AppModule.
We will create the separate AppRoutingModule and configure all routes in that module.
Use below CLI command to generate AppRoutingModule in src/app
ng generate module app-routing --flat --module=app

Note :
--flat puts the file in src/app instead of its own folder.--module=app tells the CLI to register it in the imports array of the AppModule
- Note
You can also create module using following CLI command
ng generate module app-routing
This command creates app-routing module in a separate folder as src/app/app-routing, as well as, we need to manually import AppRoutingModule into the AppModule.
The generated app-routing.module.ts look like :
import { NgModule } from '@angular/core';
import { CommonModule } from '@angular/common';

@NgModule({
  imports: [
    CommonModule
  ],
  declarations: []
})
export class AppRoutingModule { }
We generally don’t declare components in a routing module so we will delete the @NgModule.declarations array and delete CommonModule references too.
We will configure the router with Routes in the RouterModule so import those two symbols from the @angular/router library.
Add an @NgModule.exports array with RouterModule in it. Exporting RouterModule makes router directives available for use in the AppModule components that will need them.
AppRoutingModule looks like this now:
import { NgModule } from '@angular/core';
import { Routes, RouterModule } from '@angular/router';

@NgModule({
  exports : [RouterModule]
})
export class AppRoutingModule { } Routes tell the router which view to display when a user clicks a link or pastes a URL into the browser address bar.
We need to add the routes in app-routing.module.ts
A typical Angular Route has two properties :
path: a string that matches the URL in the browser address bar.component: the component that the router should create when navigating to this route.
We want to navigate to the ProductsComponent when the URL is something like localhost:4200/products.
Import the ProductsComponent, so we can reference it in a Route. Then we will define an array of routes with a single route to that component in app-routing.module.ts as shown below,
const routes: Routes = [
  {path: 'products', component: ProductsComponent}
];
The same way we will also add the routes of AddProductModelComponent and AddProductTemplateComponent.
const routes: Routes = [
  {path: 'products', component: ProductsComponent},
  {path: 'add-product-template', component : AddProductTemplateComponent },
  {path: 'add-product-model', component: AddProductModelComponent}
];
Once you’ve finished setting up, the router will match that URL to path: 'products' and display the ProductsComponent, same way, add-product-template path for the AddProductTemplateComponent and so on.
- Note
You can also create the multiple paths for the same component. For Example, in below code, I have created two paths for the ProductsComponent.
const routes: Routes = [
  {path: 'products', component: ProductsComponent},
  {path: 'product-list', component : ProductsComponent},
  {path: 'add-product-template', component : AddProductTemplateComponent },
  {path: 'add-product-model', component: AddProductModelComponent}
]; We have created the routes for ProductsComponents, AddProductModelComponent, and AddProductTemplateComponent, but we have not initialized it in the RouterModule.
We must have to initialize the router and start it listening for browser location changes.
So we will add RouterModule to the @NgModule.imports array and configure it with the routes in one step by calling RouterModule.forRoot() within the imports array, as shown below
import { NgModule } from '@angular/core';
import { Routes, RouterModule } from '@angular/router';

@NgModule({
  imports : [ RouterModule.forRoot(routes)],
  exports : [ RouterModule ]
})
export class AppRoutingModule { } Till now, we are using a selector of a particular component to display that component on the screen. but now we want to display the component based on URL path.
For this, replace the app-add-product-template selector with router-outlet in app.component.html . as shown below.
<div class="jumbotron jumbotron-fluid">
  <div class="container">
    <h1 class="display-3">Welcome to Electronic-Shop</h1>
    <p class="lead">THE ONLINE MEGASTORE</p>
    <hr class="my-2">
  </div>
</div>

<div class="container-fluid">
      <router-outlet></router-outlet>
</div>
The
<router-outlet>tells the router where to display routed views.
The RouterOutlet is one of the router directives that became available to the AppComponent because AppModule imports AppRoutingModule which exported RouterModule.
If you have not imported AppRoutingModule in AppModule during module generation you need to import it manually, otherwise, it will raise an error while you serve the application.
Now serve the application using ng serve command
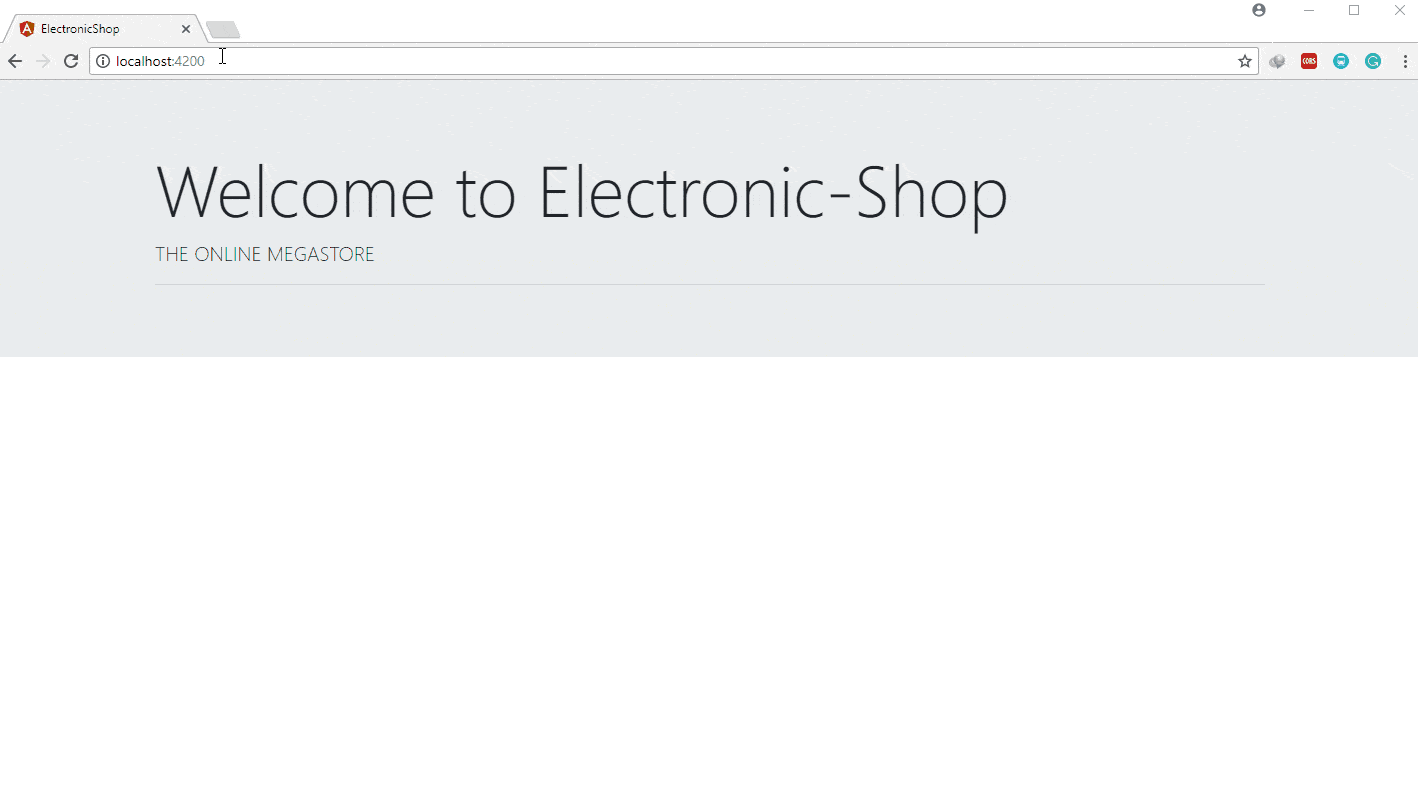
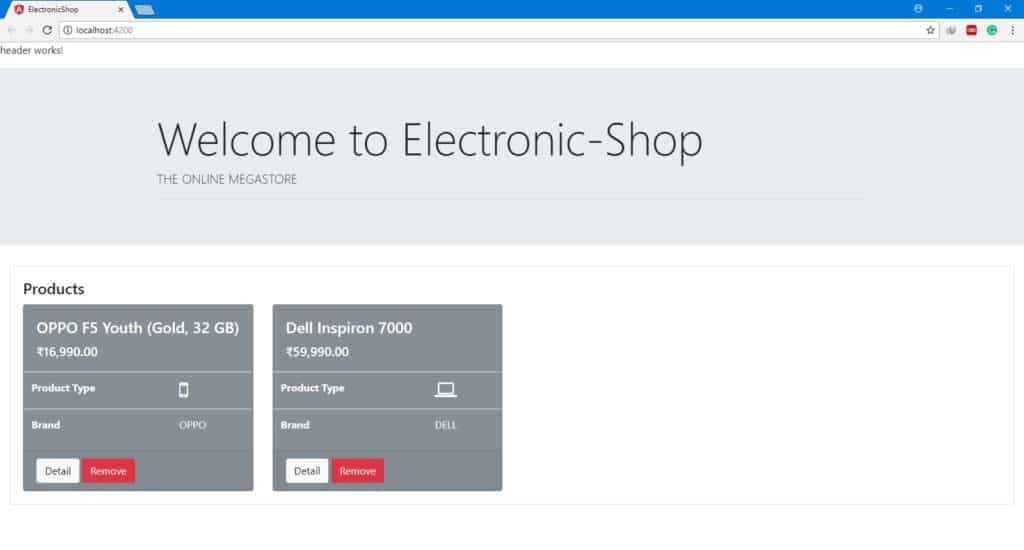
The browser should refresh and display the jumbotron with the welcome message and tagline. but not the list of products.
Look at the browser’s address bar. The URL ends in / or blank. which is the default path of the application. The route path to ProductsComponent is /products.
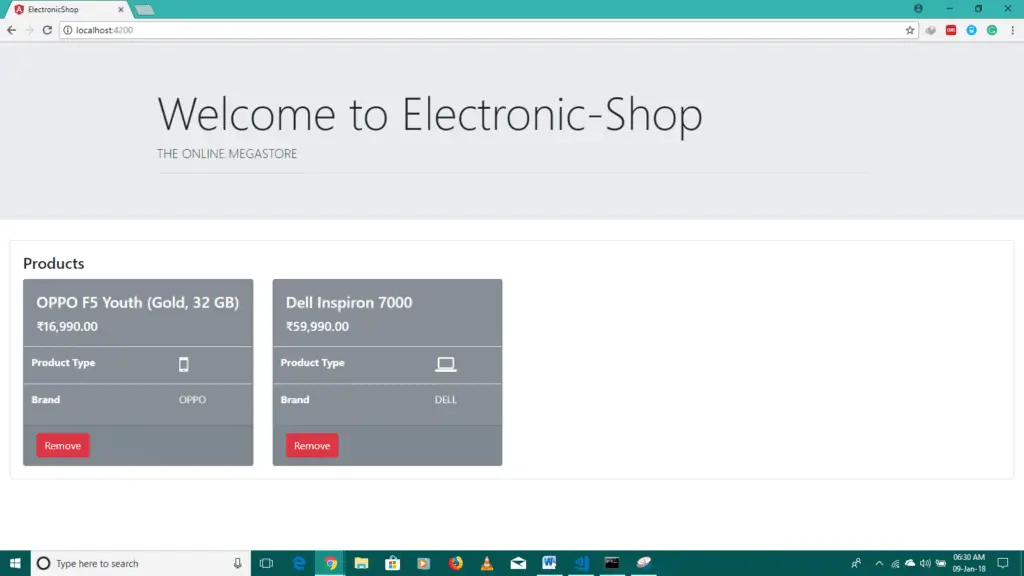
Append /products to the URL in the browser address bar. Now you can see the familiar products view on the screen.
The same way you can navigate to the /add-product-template and /add-product-model, as shown below
We have not added any default route, so if URL is ending with / as discussed above, router will not able to find any component match. So it will display blank for http://localhost:4200/ URL, as shown above.
We do not want this, so we will add the default route to ProductsComponent, as shown below, default path will route to the ProductsComponent.
const routes: Routes = [
  {path: '', component: ProductsComponent},
  {path: 'products', component: ProductsComponent},
  {path: 'add-product-template', component : AddProductTemplateComponent },
  {path: 'add-product-model', component: AddProductModelComponent}
];
Now once application refresh, you can see the default products view. as shown below
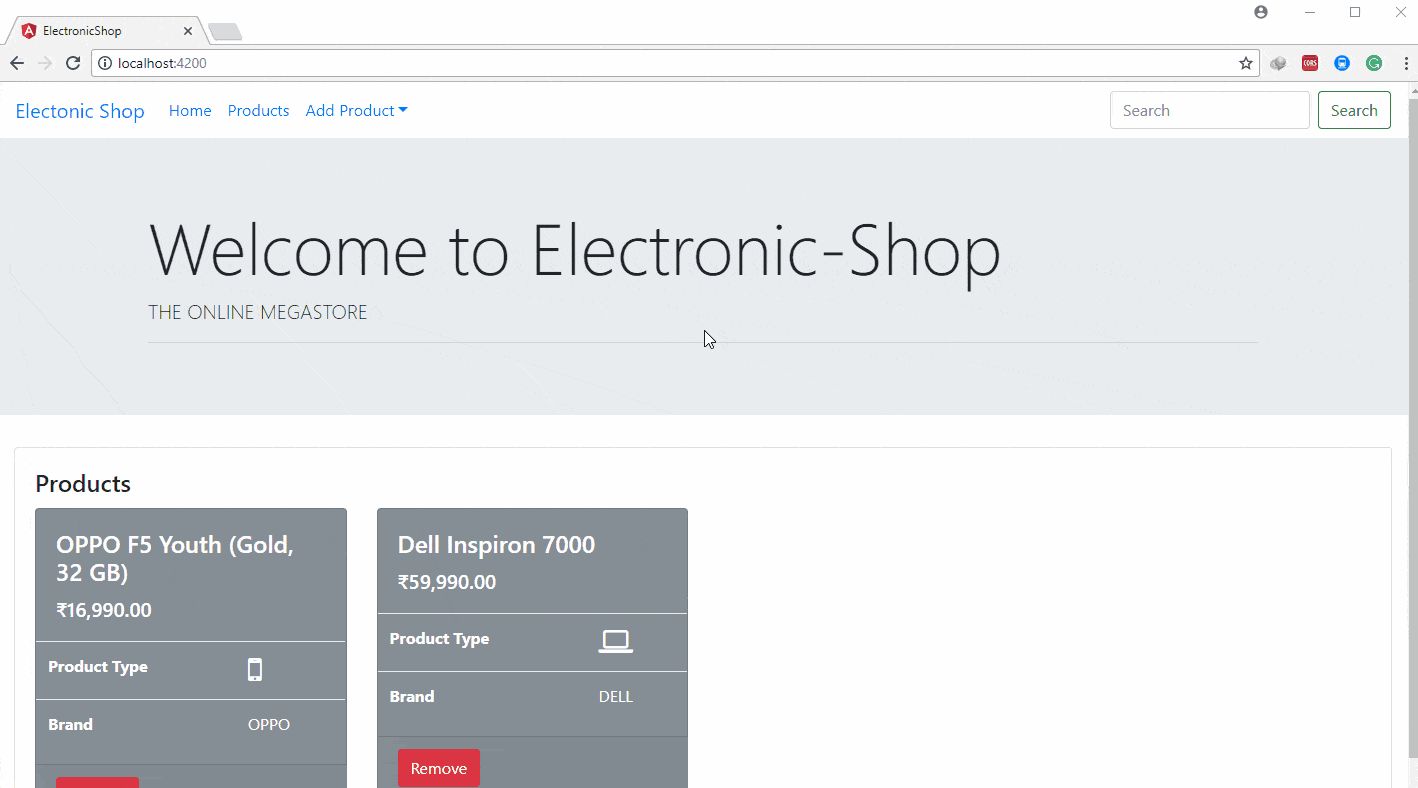
Users should not have to paste a route URL into the address bar. They should be able to click a link to navigate.
For this purpose, we will create one navigation bar from which user can navigate to any view.
We can create a navigation bar in AppComponent directly, but it is a good practice to maintain sidebar and header layout in a separate module.
We will create separate LayoutModule and import this module in AppModule so that Components of LayoutModule can be used in AppModule Components.
Generate LayoutModule using below CLI command.
ng g module layout --module=app

As shown above, this command will create LayoutModule in src/app/layout folder as well as update LayoutModule in the @NgModule.imports of AppModule.
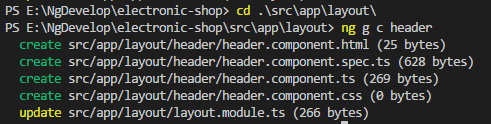
Now run the following CLI command in layout folder to add HeaderComponent in LayoutModule.
cd .\src\app\layout
ng g c header
Add <app-header> selector in the app.component.html, as shown below
<app-header></app-header>

<div class="jumbotron jumbotron-fluid">
  <div class="container">
    <h1 class="display-3">Welcome to Electronic-Shop</h1>
    <p class="lead">THE ONLINE MEGASTORE</p>
    <hr class="my-2">
  </div>
</div>

<div class="container-fluid">
      <router-outlet></router-outlet>
</div>
Once you run the application, you will get an error message in browser console like
Uncaught Error: Template parse errors: ‘app-header’ is not a known element:
This error message also provides the tips to solve an issue as
1. If ‘app-header’ is an Angular component, then verify that it is part of this module.
2. If ‘app-header’ is a Web Component then add ‘CUSTOM_ELEMENTS_SCHEMA’ to the ‘@NgModule.schemas’ of this component to suppress this message. (“<div class=”jumbotron jumbotron-fluid”>
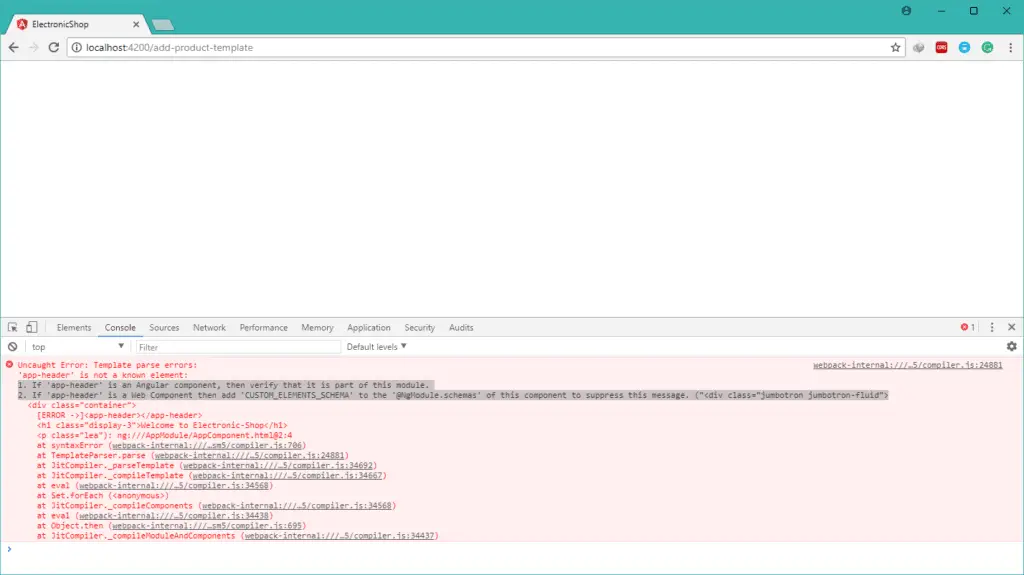
This error is raised because, we have used the selector of HeaderComponent in AppComponent Template. we have imported LayoutModule in AppModule, but we have not exported HeaderComponent from LayoutModule.
To use HeaderComponent in the external module we need to export it from LayoutModule. So add HeaderComponent in @NgModule.exports of LayoutModule.
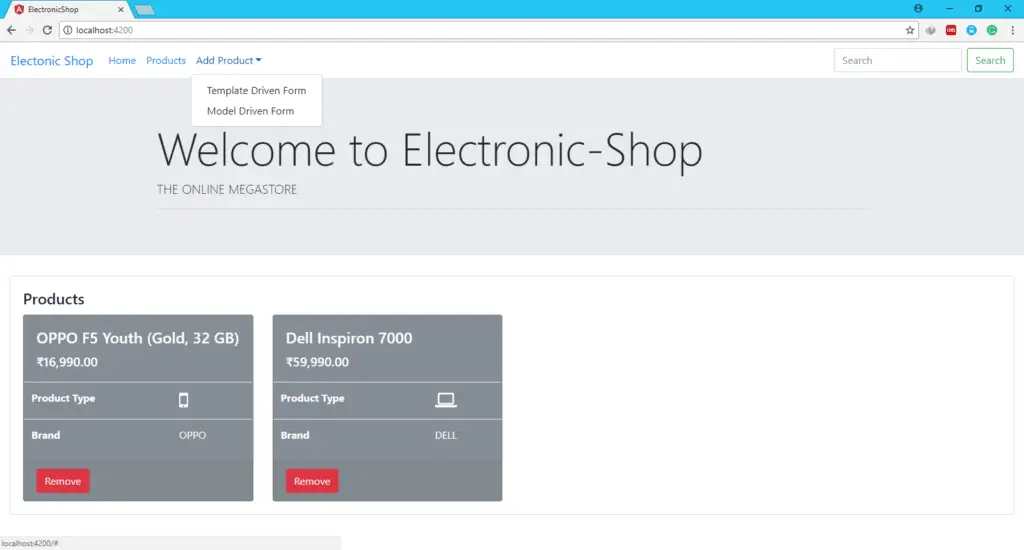
Now you can see the default content of HeaderComponent displayed on the screen.
Now update the header.component.html, and add the navigation bar as shown below
<nav class="navbar navbar-expand-sm">
    <a class="navbar-brand" href="#">Electonic Shop</a>
    <button class="navbar-toggler hidden-lg-up" type="button" data-toggle="collapse" data-target="#collapsibleNavId" aria-controls="collapsibleNavId"
        aria-expanded="false" aria-label="Toggle navigation">
    <i class="fa fa-bars" aria-hidden="true"></i>
    </button>
    <div class="collapse navbar-collapse" id="collapsibleNavId">
        <ul class="navbar-nav mr-auto mt-2 mt-lg-0">
            <li class="nav-item active">
                <a class="nav-link" href="#">Home <span class="sr-only">(current)</span></a>
            </li>
            <li class="nav-item">
                <a class="nav-link" href="#">Products</a>
            </li>
            <li class="nav-item dropdown">
                <a class="nav-link dropdown-toggle" href="#" id="dropdownId" data-toggle="dropdown" aria-haspopup="true" aria-expanded="false">Add Product</a>
                <div class="dropdown-menu" aria-labelledby="dropdownId">
                    <a class="dropdown-item" href="#">Template Driven Form</a>
                    <a class="dropdown-item" href="#">Model Driven Form</a>
                </div>
            </li>
        </ul>
        <form class="form-inline my-2 my-lg-0">
            <input class="form-control mr-sm-2" type="text" placeholder="Search">
            <button class="btn btn-outline-success my-2 my-sm-0" type="submit">Search</button>
        </form>
    </div>
</nav> - Tip
!!! You do not have to write above code manually,
If you have installed Bootstrap Snippet extension, then just write b4-nav on header.component.html, you will get different code snippets of the navigation bar,
I have used b4-navbar-background, but without background color.
This will generate above code structure, with default menu items and search box, you can customize it as you requirement
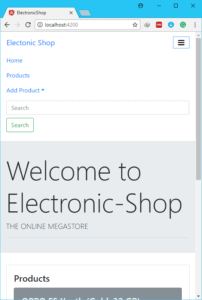
This will look as below in desktop view and mobile view respectively:
Note here, once you click on the link you will not be able to route to any component. because we have not set any route to that links.
The RouterLink directives let you link to specific parts of your app.
We will add the routerLink to anchor tags (navigation links) of navigation bar as shown below,
<a class="dropdown-item" routerLink="/add-product-template">Template Driven Form</a>
<a class="dropdown-item" routerLink="/add-product-model">Model Driven Form</a>
The same way we will add the routerLink for the Home, and Products Menu
Note: to use routerLink directive in HeaderComponent, we need to add RouterModule or AppRoutingModule in @NgModule.imports of LayoutModule
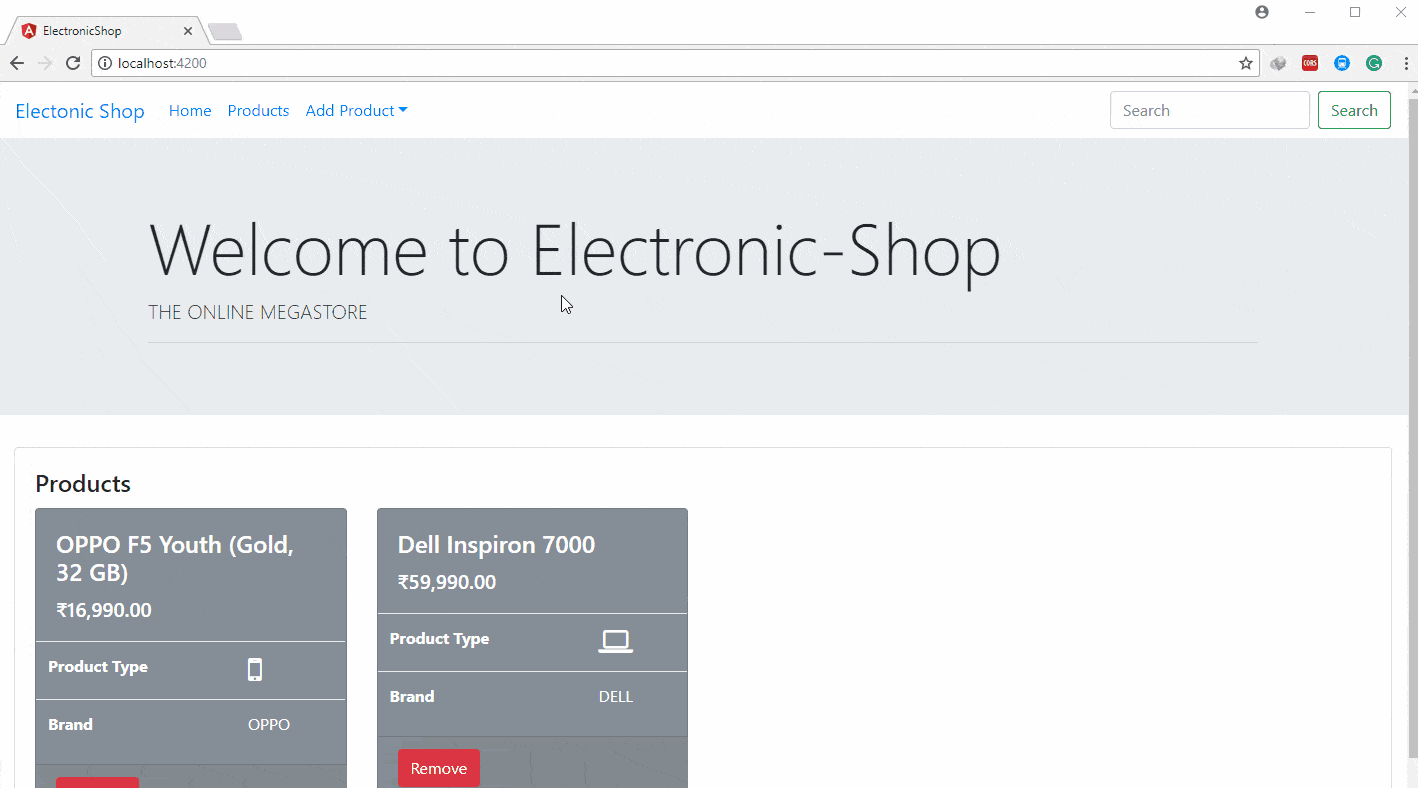
Now once the application refreshed, you can see that you can navigate to the different component using Navigation Bar. as shown below.
Till now we have used routerLink on Component Template to navigate between the different components.
Now suppose we want to navigate from the component method, for example, if the product added successfully in addProduct() method of AddProductTemplateComponent, we want to navigate to the products view.
For this purpose, we can use Router of @angular/router library.
Follow below steps in AddProductTemplateComponent,
- import
Routerfrom@angular/router - add
router: Routerdependency in the constructor - use
router.navigateByUrl(‘/products’)method to navigate to/products
as shown below,
import { Router } from '@angular/router';
...
export class AddProductTemplateComponent implements OnInit {
  ...

  constructor(private productService: ProductService,
              private router: Router) { }

  addProduct() {
    this.productService.addProduct(this.product);
    this.formSubmitted = true;
    this.router.navigateByUrl('/products');

  }

  ...

}
Now as shown below, once you successfully add a new product, the page is redirected to the products view with the added product.
The same way we will add the navigation in AddProductModelComponent.
you can also use this.router.navigate(['/products']) instead of navigateByUrl('/products').
These both methods have some vari ion, but for just simple URL redirection, we can use any of the above method.
Suppose our new requirement is to display product details, as per new requirement the URL like ~/products/11 can be used to display product details of product id 11.
for this type of scenario, we need to read the parameter from the URL using some router mechanism. but before that let’s create the product details component.
Use below CLI command to generate product-detail component in /src/app.
ng g c product-detail
This will create a new ProductDetailComponent. and update the AppModule.
Initial ProductDetailComponent would be like :
import { Component, OnInit } from '@angular/core';

@Component({
  selector: 'app-product-detail',
  templateUrl: './product-detail.component.html',
  styleUrls: ['./product-detail.component.css']
})
export class ProductDetailComponent implements OnInit {


  constructor() {
  }

  ngOnInit() {
  }

}
Now, next step is to create the route of ProductDetailComponent in app-routing.module.ts.
For this, we will import ProductDetailComponent in app-routing.module.ts and then add a parameterized route to the AppRoutingModule.routes array that matches the path pattern to the ProductDetail as shown below :
import { ProductDetailComponent } from './product-detail/product-detail.component';
...
const routes: Routes = [
 {path: 'products/:id', component: ProductDetailComponent},
 ...
];

@NgModule({
  imports : [ RouterModule.forRoot(routes)],
  exports : [RouterModule]
})
export class AppRoutingModule { }
The colon (:) in the path indicates that :id is a placeholder for a specific product id
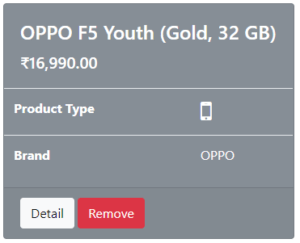
Now we will add one Detail button in ProductComponent, to navigate to the Product Detail View, as shown below
<button type="button" class="btn btn-light" [routerLink]="['/products',product.id]" >Detail</button>
- Note
I have used [routerLink] which is the different variation for routerLink.
If you use dynamic values to generate the link, you can pass an array of path segments, followed by the params for each segment.
for example, [routerLink]="['/products',product.id]" we want to generate the URL like /products/11, where 11 is the product id
after adding the Detail button, ProductComponent is shown as below,
Yet we have not read the id from the URL in ProductDetailComponent.
So let’s work on ProductDetailComponent.
Below steps we need to follow :
- Get the route that created
ProductDetailComponent, for example,~/products/11, - Extract the
idfrom the route - Get the product with that
idfrom the server via theProductService
Add the following imports in product-detail.component.ts and
Inject the ActivatedRoute, ProductService, and Location services into the constructor, saving their values in private fields, as shown below
import { ProductService } from './../service/product.service';
import { Product } from './../models/product';
import { Component, OnInit } from '@angular/core';
import { ActivatedRoute } from '@angular/router';
import { Location } from '@angular/common';

@Component({
  selector: 'app-product-detail',
  templateUrl: './product-detail.component.html',
  styleUrls: ['./product-detail.component.css']
})
export class ProductDetailComponent implements OnInit {

  product: Product;

  constructor(private activatedRoute: ActivatedRoute,
    private location: Location,
    private productService: ProductService) {
  }

  ngOnInit() {

  }

}
- Note
The ActivatedRoute holds information about the route to this instance of the ProductDetailComponent. This component is interested in the route’s bag of parameters extracted from the URL. The “id” parameter is the id of the product to display.
The ProductService gets Product data from the remote server(now we will get from mock data, later we will use HTTP calls for remote server) and this component will use it to get the hero-to-display.
The Location is an Angular service for interacting with the browser. We’ll use it later to navigate back to the view that navigated here.
Now extract the id parameter from the route using ActivatedRoute, once we get id we will call the getProduct(id) method of ProductService. as shown below,
ngOnInit() {
    let id = +this.activatedRoute.snapshot.paramMap.get('id');
    console.log('ID : ' + id );
    this.product = this.productService.getProduct(id);
} - The
activatedRoute.snapshotis a static image of therouteinformation shortly after the component was created. - The
paramMapis a dictionary of route parameter values extracted from the URL. The"id"key returns the id of the product to fetch. - Route parameters are always strings. The JavaScript (+) operator converts the string to a number, which is what a product id should be.
The browser refreshes and the app crash with a compiler error. ProductService doesn’t have a getProduct() method. Add it now.
export class ProductService {
  ...
  getProduct(id: number) {
    return this.products.find( p => p.id === id);
  }
}
Now we get the product object, next step is to show this product details on view using the template of this component. As shown below, update the product-detail.component.html.
<div class="card">
  <div class="card-body">
    <h4 class="card-title">PRODUCT DETAILS :
      <i *ngIf="product.productType=='Mobile'" class="fa fa-mobile" aria-hidden="true"></i>
      <i *ngIf="product.productType=='Laptop'" class="fa fa-laptop" aria-hidden="true"></i>
    </h4>
    <div class="row">
      <div class="col-md-6">
        <table class="table">
          <tr>
            <th>Product ID</th>
            <td>{{product.id}}</td>
          </tr>
          <tr>
            <th>Title</th>
            <td>{{product.title}}</td>
          </tr>
          <tr>
            <th>Model Name</th>
            <td>{{product.modelName}}</td>
          </tr>
          <tr>
            <th>Color</th>
            <td>{{product.color}}</td>
          </tr>
          <tr>
            <th>Brand</th>
            <td>{{product.brand}}</td>
          </tr>
          <tr>
            <th>Price</th>
            <td>{{product.price | currency : 'INR'}}</td>
          </tr>

        </table>
      </div>

    </div>
  </div>
</div>
The browser refreshes and the app is working again. You can click a detail in the product, navigate to that product’s detail view.
If you paste localhost:4200/products/11 in the browser address bar, the router navigates to the detail view for the product with id: 11
By clicking the browser’s back button, you can go back to the products view, depending upon which sent you to the detail view.
It would be nice to have a button on the ProductDetailComponent view that can do that.
Add a go back button to the bottom of the ProductDetailComponent template and bind it to the component’s goBack() method. As shown below,
<button type="button" class="btn btn-primary" (click)="goBack()">Back</button>
Add a goBack() method to the component class that navigates backward one step in the browser’s history stack using the Location service that we have injected previously.
goBack() {
    this.location.back();
}
Refresh the browser and start clicking. Users can navigate around the app, products view to the product detail, as well as can navigate using the navigation bar on top of the screen.
We have met all of the navigational requirements that is required for a normal web application.
import { ProductDetailComponent } from './product-detail/product-detail.component';
import { AddProductModelComponent } from './add-product-model/add-product-model.component';
import { AddProductTemplateComponent } from './add-product-template/add-product-template.component';
import { NgModule } from '@angular/core';
import { Routes, RouterModule } from '@angular/router';
import { ProductsComponent } from './products/products.component';

const routes: Routes = [
  {path: '', component: ProductsComponent},
  {path: 'products', component: ProductsComponent},
  {path: 'products/:id', component: ProductDetailComponent},
  {path: 'add-product-template', component : AddProductTemplateComponent },
  {path: 'add-product-model', component: AddProductModelComponent}
];

@NgModule({
  imports : [ RouterModule.forRoot(routes)],
  exports : [RouterModule]
})
export class AppRoutingModule { }
import { ProductService } from './service/product.service';
import { BrowserModule } from '@angular/platform-browser';
import { NgModule } from '@angular/core';
import { FormsModule, ReactiveFormsModule } from '@angular/forms';
import { AppComponent } from './app.component';
import { ProductsComponent } from './products/products.component';
import { ProductComponent } from './product/product.component';
import { AddProductModelComponent } from './add-product-model/add-product-model.component';
import { AddProductTemplateComponent } from './add-product-template/add-product-template.component';
import { AppRoutingModule } from './app-routing.module';
import { LayoutModule } from './layout/layout.module';
import { ProductDetailComponent } from './product-detail/product-detail.component';

@NgModule({
  declarations: [
    AppComponent,
    ProductsComponent,
    ProductComponent,
    AddProductModelComponent,
    AddProductTemplateComponent,
    ProductDetailComponent
  ],
  imports: [
    BrowserModule,
    FormsModule,
    ReactiveFormsModule,
    AppRoutingModule,
    LayoutModule
  ],
  providers: [ProductService],
  bootstrap: [AppComponent]
})
export class AppModule { }
import { NgModule } from '@angular/core';
import { CommonModule } from '@angular/common';
import { HeaderComponent } from './header/header.component';
import { RouterModule } from '@angular/router';

@NgModule({
  imports: [
    CommonModule,
    RouterModule
  ],
  declarations: [HeaderComponent],
  exports : [HeaderComponent]
})
export class LayoutModule { }
import { Component, OnInit } from '@angular/core';

@Component({
  selector: 'app-header',
  templateUrl: './header.component.html',
  styleUrls: ['./header.component.css']
})
export class HeaderComponent implements OnInit {

  constructor() { }

  ngOnInit() {
  }

}
import { ProductService } from './../service/product.service';
import { Product } from './../models/product';
import { Router } from '@angular/router';
import { Component, OnInit } from '@angular/core';

@Component({
  selector: 'app-add-product-template',
  templateUrl: './add-product-template.component.html',
  styleUrls: ['./add-product-template.component.css']
})
export class AddProductTemplateComponent implements OnInit {

  product: Product = new Product();
  formSubmitted = false;
  productTypes = ['Laptop', 'Mobile' ];
  constructor(private productService: ProductService,
              private router: Router) { }

  ngOnInit() {
  }

  addProduct() {
    this.productService.addProduct(this.product);
    this.formSubmitted = true;
    this.router.navigateByUrl('/products');
  }

}
import { ProductService } from './../service/product.service';
import { Component, OnInit } from '@angular/core';
import { FormGroup, FormControl} from '@angular/forms';
import { Validators} from '@angular/forms';
import { Product } from '../models/product';
import { Router } from '@angular/router';
@Component({
selector: 'app-add-product-model',
templateUrl: './add-product-model.component.html',
styleUrls: ['./add-product-model.component.css']
})
export class AddProductModelComponent implements OnInit {
productTypes = ['Laptop', 'Mobile'];
formSubmitted = false;
myForm: FormGroup;
title: FormControl;
modelName: FormControl;
color: FormControl;
productType: FormControl;
brand: FormControl;
price: FormControl;
constructor(private productService: ProductService,
private router: Router) { }
ngOnInit() {
this.title = new FormControl('', [Validators.required, Validators.minLength(10)]);
this.modelName = new FormControl();
this.color = new FormControl('', Validators.pattern('[a-zA-Z]*'));
this.productType = new FormControl('', Validators.required);
this.brand = new FormControl('', Validators.required);
this.price = new FormControl('', [Validators.required, Validators.min(1)]);
this.myForm = new FormGroup({
'title': this.title,
'modelName' : this.modelName,
'productType' : this.productType,
'color': this.color,
'brand': this.brand,
'price': this.price
});
}
addProduct(product: Product) {
this.productService.addProduct(product);
this.formSubmitted = true;
this.router.navigateByUrl('/products');
}
}import { ProductService } from './../service/product.service';
import { Product } from './../models/product';
import { Component, OnInit } from '@angular/core';
import { ActivatedRoute } from '@angular/router';
import { Location } from '@angular/common';
@Component({
selector: 'app-product-detail',
templateUrl: './product-detail.component.html',
styleUrls: ['./product-detail.component.css']
})
export class ProductDetailComponent implements OnInit {
product: Product;
constructor(private activatedRoute: ActivatedRoute,
private location: Location,
private productService: ProductService) {
}
ngOnInit() {
let id = +this.activatedRoute.snapshot.paramMap.get('id');
console.log('ID : ' + id );
this.product = this.productService.getProduct(id);
}
goBack() {
this.location.back();
}
}import { MockData } from './../mock-data/mock-product-data';
import { Injectable } from '@angular/core';
import { Product } from '../models/product';
@Injectable()
export class ProductService {
products: Product[] = [];
constructor() {
this.products = MockData.Products;
}
getProducts(): Product[] {
return this.products;
}
addProduct(product: Product) {
this.products.push(product);
}
removeProduct(product: Product) {
let index = this.products.indexOf(product);
if (index !== -1) {
this.products.splice(index, 1);
}
}
getProduct(id: number) {
return this.products.find( p => p.id === id);
}
} <app-header></app-header>
<div class="jumbotron jumbotron-fluid">
<div class="container">
<h1 class="display-3">Welcome to Electronic-Shop</h1>
<p class="lead">THE ONLINE MEGASTORE</p>
<hr class="my-2">
</div>
</div>
<div class="container-fluid">
<router-outlet></router-outlet>
</div><nav class="navbar navbar-expand-sm">
<a class="navbar-brand" routerLink="/">Electonic Shop</a>
<button class="navbar-toggler hidden-lg-up" type="button" data-toggle="collapse" data-target="#collapsibleNavId" aria-controls="collapsibleNavId"
aria-expanded="false" aria-label="Toggle navigation">
<i class="fa fa-bars" aria-hidden="true"></i>
</button>
<div class="collapse navbar-collapse" id="collapsibleNavId">
<ul class="navbar-nav mr-auto mt-2 mt-lg-0">
<li class="nav-item active">
<a class="nav-link" routerLink="/">Home <span class="sr-only">(current)</span></a>
</li>
<li class="nav-item">
<a class="nav-link" routerLink="/products">Products</a>
</li>
<li class="nav-item dropdown">
<a class="nav-link dropdown-toggle" href="#" id="dropdownId" data-toggle="dropdown" aria-haspopup="true" aria-expanded="false">Add Product</a>
<div class="dropdown-menu" aria-labelledby="dropdownId">
<a class="dropdown-item" routerLink="/add-product-template">Template Driven Form</a>
<a class="dropdown-item" routerLink="/add-product-model">Model Driven Form</a>
</div>
</li>
</ul>
<form class="form-inline my-2 my-lg-0">
<input class="form-control mr-sm-2" type="text" placeholder="Search">
<button class="btn btn-outline-success my-2 my-sm-0" type="submit">Search</button>
</form>
</div>
</nav><div class="card">
<div class="card-body">
<h4 class="card-title">PRODUCT DETAILS :
<i *ngIf="product?.productType=='Mobile'" class="fa fa-mobile" aria-hidden="true"></i>
<i *ngIf="product?.productType=='Laptop'" class="fa fa-laptop" aria-hidden="true"></i>
</h4>
<div class="row">
<div class="col-md-6">
<table class="table">
<tr>
<th>Product ID</th>
<td>{{product?.id}}</td>
</tr>
<tr>
<th>Title</th>
<td>{{product?.title}}</td>
</tr>
<tr>
<th>Model Name</th>
<td>{{product?.modelName}}</td>
</tr>
<tr>
<th>Color</th>
<td>{{product?.color}}</td>
</tr>
<tr>
<th>Brand</th>
<td>{{product?.brand}}</td>
</tr>
<tr>
<th>Price</th>
<td>{{product?.price | currency : 'INR'}}</td>
</tr>
</table>
<button type="button" class="btn btn-primary" (click)="goBack()">Back</button>
</div>
</div>
</div>
</div> 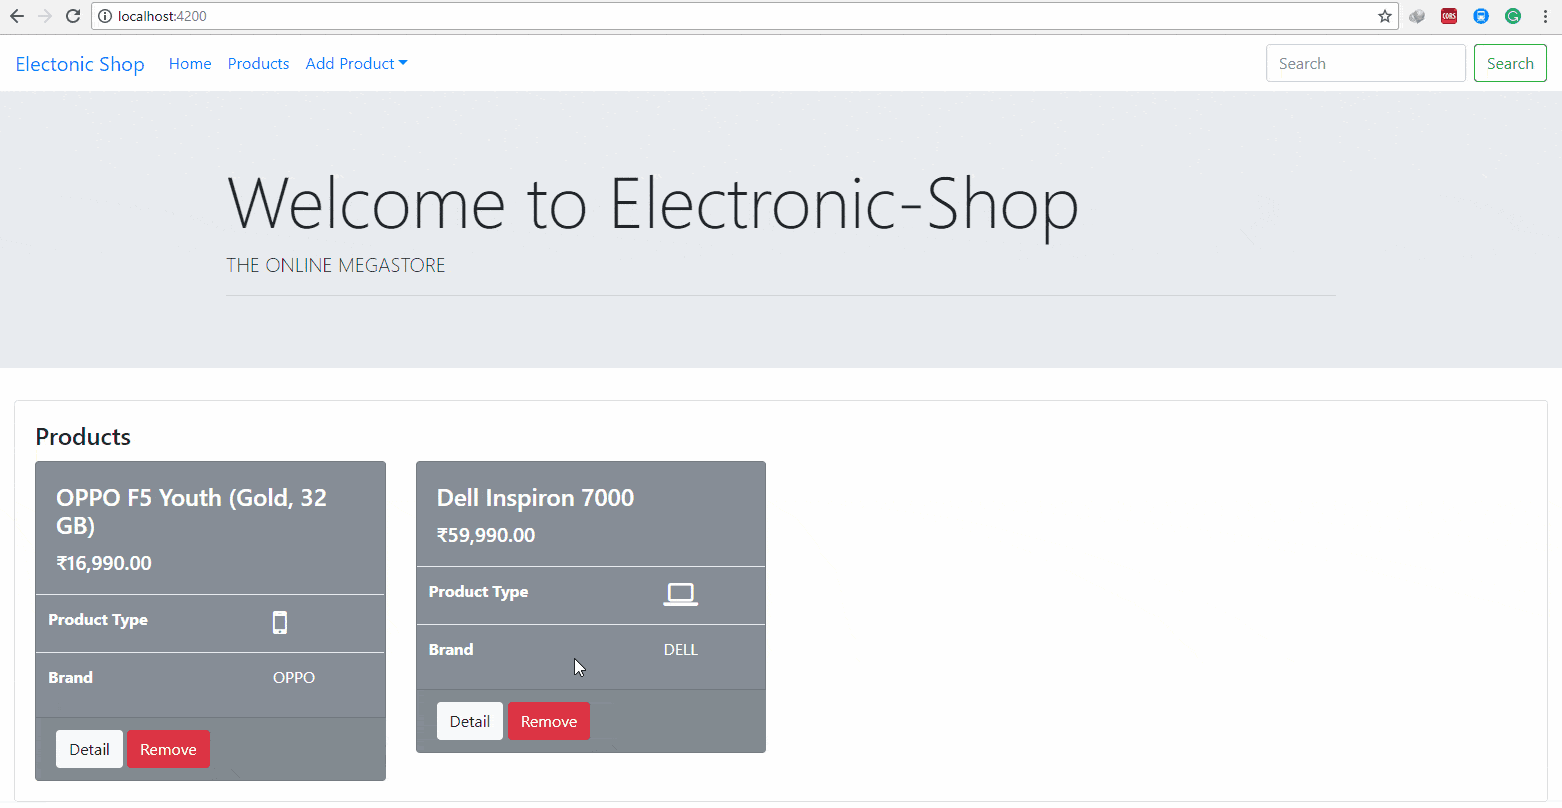
In this chapter, we have seen
- Angular Routing Mechanism.
- Navigation using RouterModule, Router, and Routes
- Purpose of RouterOutlet
- Navigation bar with links
- Purpose of routerLink directive
- Parameterized Route using ActivatedRoute.
- Location to perform browser functions.