
Angular Basics
Till now you have seen,
- A history of an angular
- How to create a new angular project?
- The project structure of an angular
- The architecture of the angular application.
Now In angular basics, we will continue with our my-app application, which we have created in the Get Started chapter.
In this chapter, we will see general purpose syntax of an angular and then in the next chapter we will create a new application, using advanced features of an angular.
for basic syntax purpose, we will see the above topics only in AppComponent . From the next chapter we will create a different component for the different purpose.
Before you start with the developing, first serve the application using ng serve command. So that you can see the output as you do the changes in the application.
We will also remove all the default content of app.component.html
Till now, app.component.ts contains only one property called title. Now we will add another properties.
The basic syntax to create any property in angular is :
<propertyName> : <propertyType> = <value>;
propertyNameis any name which you want to use like title, userName, mobileNo, emailId etc.propertyTypecan be string, number, boolean etc., if the property type is not fixed you can use property type as any.- You can assign the property to the declaration part using
value. But it is optional.
here we will create three properties userName, mobileNo, and emailId
userName: string = 'Ankit';
mobileNo: number = 9898343434;
emailId: string = '[email protected]';
- Note
if you are using TSLint extension then it will show you a red underline below the property name. it is not an error. Your code will run perfectly, but for the angular code standards, it is not a preferred way to use property type if you are initializing the property at the time of declaration.
To remove this error just hover over the redline and it will show you light bulb type icon, click on that icon and then select Fix from the list.
Your code will look as below.
title = 'Welcome to Angular Application';

userName = 'Ankit';
mobileNo = 9898343434;
emailId = '[email protected]';
As we have seen above, we can initialize the property at the declaration time.
As well as, we can also declare it in the constructor or methods. as you can see below
userName: string;
mobileNo: number;
emailId: string;

constructor() {
  this.userName = 'Ankit';
  this.mobileNo = 9898343434;
  this.emailId = '[email protected]';
}
As you can see above, userName, mobileNo and emailId are initialized in the constructor.
To access class level property in constructor or method, we need to use this keyword.
Now we will display above properties on the screen using the template of the angular component.
Go to app.component.html (default template of AppComponent)
As we have discussed in the Data Binding of Angular Architecture, We need to use String Interpolation to display any property on screen.
Syntax of String Interpolation is {{ }}
<h1>{{title}}</h1>
<hr>
<ul>
  <li>User Name : {{userName}}</li>
  <li>Mobile No : {{mobileNo}}</li>
  <li>Email ID : {{emailId}}</li>
</ul>

<hr>
<h2>Arithmetic Operation :</h2>
<h3> <strong ngNonBindable> {{(5*5+1)/2}} </strong> : {{(5*5+1)/2}}</h3>

<hr>
<h3>Built In Pipes : {{ userName | uppercase }}</h3>
It will show you output as below
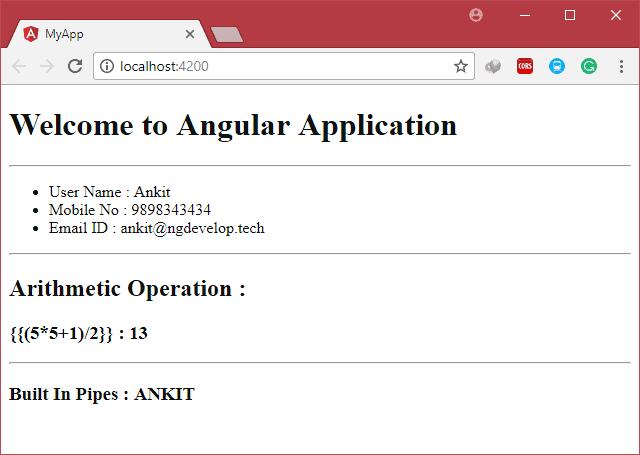
A use of Interpolation is more than simply display the properties of Component on screen.
As you can see in the code, Interpolation can also perform an arithmetic calculation. Like {{(5*5+1)/2}} will give you result 13.
You can increase the strength of interpolation by using angular pipes with it. You can transform input to different formats using pipes like uppercase, lowercase, date etc.
<h3>Built In Pipes : {{ userName | uppercase }}</h3> As you can see in the code you can display userName in the upper case using uppercase pipe with the interpolation.
- Note
If you want to display interpolation code as a simple string on a screen you need to use ngNonBindable directive. For Example,
<strong ngNonBindable> {{(5*5+1)/2}} </strong> This will simply print the content as it is on screen.
In Angular, there are two ways to create an array.
skills: string[] = [];
or
here, we have created string type skills array.
You can use either first method or second, both have the same functionality.
Generally, I prefer to use the first method, because it is shorthand method to declare an array.
During the declaration, we can also initialize it. as shown below,
or
Once you create an array, you can insert the new array element by using push() method as shown below. This method will insert an element at the end of an array.
this.skills.push('.Net');There are a lot of other methods available like indexOf(), filter(), unshift(), find() etc.. We will see these methods later when we required it in the application.
Now, how to display this array on screen? or how to use it on template?.
One way is, you can use the String Interpolation.
This will display comma separated elements of an array, as shown below.
But if you want to process each element, then you need to use different technique instead of interpolation.
Here comes the use of NgFor.
*ngForis the Structural directive which is used to perform a repetitive task until all the elements of the collection are processed. In short, it is used to perform lopping on an array.
Syntax of *ngFor :
*ngFor= "let <temp-name-individual-item> of <array-property>"
For example,
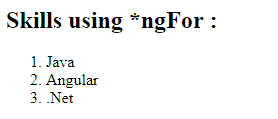
<h2>Skills using *ngFor :</h2>
<ol>
  <li *ngFor="let skill of skills">{{skill}}</li>
</ol> - Tip
If you have installed Angular v5/v6 Snippet extension, then just write a-ngFor, it will generate below code for you
*ngFor="let item of list"
This will display each element in the ordered list. As you can see below
Now let’s add functionality to add an element to the array.
You can create input box and one button to generate an event. But you need to bind that event with the component event handler.
Here comes the use of event binding.
Event binding is used to bind HTML control event with the event handler of a component.
<h2>Event Binding</h2>
<div>
  <label for="skill">New Skill</label>
  <input type="text" name="skill" #Skill>
  <button (click)="addSkill(Skill.value)">ADD</button>
</div>
As shown in above code, I have created one Input box named skill, and one button.
Click event of Button is mapped with addSkill() method of the component.
as you can see we have used
#Skillin the input control, this is the template reference variable.this will refer to the input box, So that you can access the value of input box usingSkill.valuein the click event.
Now to handle this event we need to write an event handler in the app.component.ts.
addSkill(skill: string) {
    this.skills.push(skill);
} 
As you can see above, once you click on the button, addSkill(skill : string) event handler will be called and it will push one element into the skills array.
Till now, we have created different properties for component like userName, mobileNo, emailId and skills.
Good practice is to combine all related properties into one class generally known as domain model.
export class User {
    userName: string;
    mobileNo: number;
    emailId: string;
    skills: string[] = ['Java', 'Angular'];

    constructor() {

    }

    addSkill(skill: string) {
        this.skills.push(skill);
    }
}
As shown above, I have created one Domain model which combines all properties into one class. Generally, we should create Domain model in a separate file.
I have created this model in user.ts file.
To use this class we need to import it into the Component. Using
import { User } from './user';You can use AutoImport extension , if you don’t want to write this line manually.
Now create the object of this class in a app.component.ts using,
user: User;
We will initialize this object in a component constructor and also assign values to the userName, mobileNo, emailId of the user object. As shown below,
this.user = new User();
this.user.userName = 'Ankit';
this.user.mobileNo = 9898343434;
this.user.emailId = '[email protected]';
On app.component.html template we need to replace {{userName}} with {{user.userName}}, {{mobileNo}} with {{user.mobileNo}} and so on…
You will get the same result as you have seen without domain model.
Finally, you can see the files which we have changed and created till now.
import { Component } from '@angular/core';
import { User } from './user';

@Component({
  selector: 'app-root',
  templateUrl: './app.component.html',
  styleUrls: ['./app.component.css']
})
export class AppComponent {
  title = 'Welcome to Angular Application';
  user: User;

  constructor() {

    this.user = new User();
    this.user.userName = 'Ankit';
    this.user.mobileNo = 9898343434;
    this.user.emailId = '[email protected]';

  }

}
<h1>{{title}}</h1>
<hr>
<ul>
<li>User Name : {{user.userName}}</li>
<li>Mobile No : {{user.mobileNo}}</li>
<li>Email ID : {{user.emailId}}</li>
</ul>
<hr>
<h2>Arithmetic Operation :</h2>
<h3> <strong ngNonBindable> {{(5*5+1)/2}} </strong> : {{(5*5+1)/2}}</h3>
<hr>
<h3>Built In Pipes : {{ user.userName | uppercase }}</h3>
<hr>
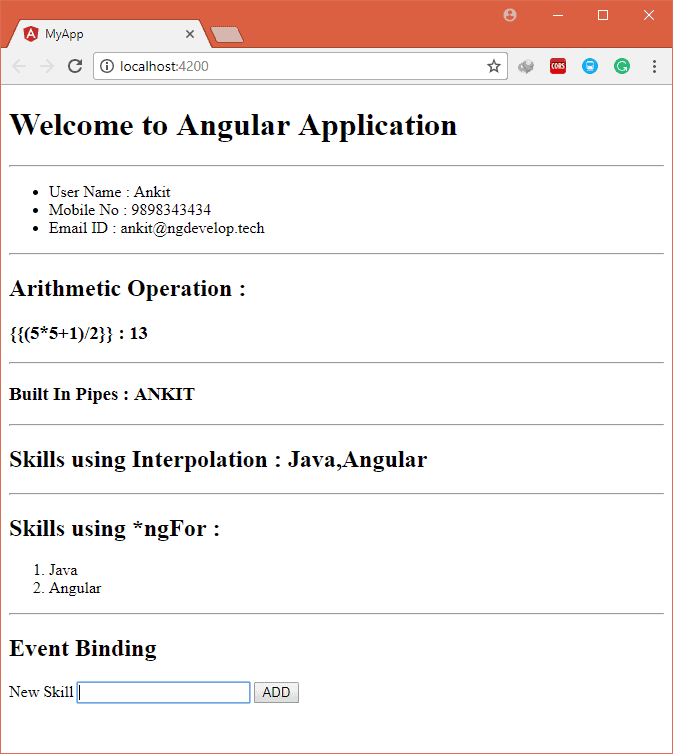
<h2>Skills using Interpolation : {{user.skills}}</h2>
<hr>
<h2>Skills using *ngFor :</h2>
<ol>
<li *ngFor="let skill of user.skills">{{skill}}</li>
</ol>
<hr>
<h2>Event Binding</h2>
<div>
<label for="skill">New Skill</label>
<input type="text" name="skill" #Skill>
<button (click)="user.addSkill(Skill.value)">ADD</button>
</div>export class User {
userName: string;
mobileNo: number;
emailId: string;
skills: string[] = ['Java', 'Angular'];
constructor() {
}
addSkill(skill: string) {
this.skills.push(skill);
}
} 
In this chapter, we have learned different angular basics concepts.
- We have created new properties in the component and initialized it using different ways.
- after that, we have seen string interpolation to display component properties on screen.
- we have also seen other features of string interpolation.
- Later we have created one array and used
*ngForto display that array on the screen - after that, we have seen the event binding to add a new element to the array.
- At the end, we have seen the domain model to combine related properties into one class.
In the next chapter, we will start to concentrate advance concepts of Angular using Electronic-Shop Tutorial.