
Recently I was working on one application where I need to export to excel in Angular 8, I need to show a set of account records with header and footer. I researched it and found some docs but it doesn’t give any proper example for angular. After all of the research, I have implemented it in my application.
In this post, I will show you how to export an excel file in angular 8.
Two important open source libraries available to read/write an excel in the client-side web applications are :
Both libraries are used to read, manipulate and write spreadsheet data and styles to XLSX and JSON.
Initially, I had used XLSX & XLSX-style libraries to create and format an excel from JSON but the adverse point of this open-source library is it doesn’t provide any feature to add an image in excel (add image feature is available in pro version), which was the big requirement for my excel.
Later on, I found ExcelJS, which is really easy to use, provide almost all the features of Excel, and the main thing is it also provide add image feature.
So let’s see,
Same as excel export, You can export a pdf file in angular application. Refer Angular Export to PDF using PDFMake blog for client-side excel generation in Angular.
Export to Excel in Angular 8 using ExcelJS
Create a Angular 8 Project
Use below command to create a new Angular 6 project with Angular CLI.
ng new angular-exceljs-example
Install ExcelJS Library
npm install --save [email protected]
Important
The latest version of exceljs (version 3.4.0 while writing the article) uses the @types/node@^10.12.0 while angular 8 uses @types/node@~8.9.4. Because of this, you might face the following error while compiling an application :
ERROR in node_modules/exceljs/index.d.ts:1661:34 - error TS2503: Cannot find namespace 'NodeJS'.

dictionary: Buffer | NodeJS.TypedArray | DataView | ArrayBuffer; // deflate/inflate only, empty dictionary by default
We can fix this by upgrading the @types/nodes to 10.12.0 but because angular 8 doesn’t use this version I will not recommend doing so, So until we required any specific feature which is released in latest exceljs version, I will recommend you to use [email protected] for angular 8 applications.
If you find any issue in angular 8 with exceljs, Refer to the comment section below which contains some useful solutions. However, if you don’t find any solution please add your issue in new comment.
Update tsconfig.js
ExcelJS is generally used for server side web applications in node. Here we want to use it in client side Angular application. for that we need to set compilerOptions in tsconfig.json as shown below :
"compilerOptions": {
    ...
    "paths": {
      "exceljs": [
        "node_modules/exceljs/dist/exceljs.min"
      ]
    }
} - Note
If you are using Angular 4 or 5 you need to use the following path in tsconfig.json
"paths": {
    "exceljs": [
    "../node_modules/exceljs/dist/es5/exceljs.browser"
    ]
}
In Linux, It is not able to find exceljs.browser or exceljs.min from tsconfig.js So remove the path from tsconfig and import ExcelJS like this:
import * as Excel from "exceljs/dist/exceljs.min.js";
import * as ExcelProper from "exceljs";
let workbook: ExcelProper.Workbook = new Excel.Workbook();
Install file-saver
FileSaver.js is the solution to saving files on the client-side and is perfect for web apps that need to generate files, or for saving sensitive information that shouldn’t be sent to an external server.
It implements the saveAs() FileSaver interface in browsers that do not natively support it.
Install file-saver library using following command
npm install --save file-saver
Environment setup is done. Now lets start to build an excel.
We will create a separate service in our project called excel.service.ts, you can create it using below command
ng generate service excel
Import ExcelJS and FileSaver
In excel.service.ts, add the following import statements.
import { Workbook } from 'exceljs';
import * as fs from 'file-saver';
Create a separate method and data varibales.
In excel.service.ts, We will create a separate method called generateExcel().
In this method, I have created some data variables as below, We will export these data in excel sheet.
Note: You can pass data from the component as a parameter in generateExcel() and generate a dynamic excel sheet.
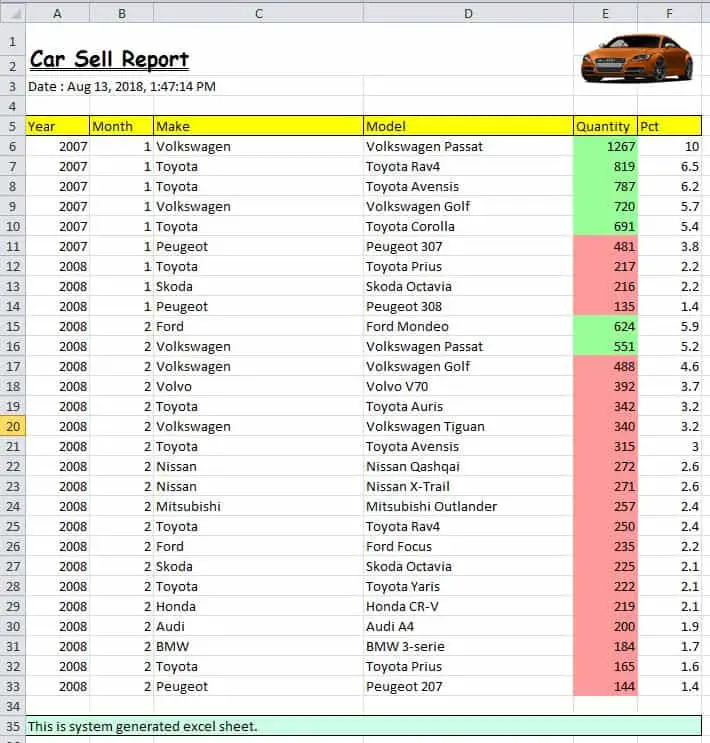
const title = 'Car Sell Report';
const header = ["Year", "Month", "Make", "Model", "Quantity", "Pct"]
const data = [
  [2007, 1, "Volkswagen ", "Volkswagen Passat", 1267, 10],
  [2007, 1, "Toyota ", "Toyota Rav4", 819, 6.5],
  [2007, 1, "Toyota ", "Toyota Avensis", 787, 6.2],
  [2007, 1, "Volkswagen ", "Volkswagen Golf", 720, 5.7],
  [2007, 1, "Toyota ", "Toyota Corolla", 691, 5.4],
  ...
];
Create Workbook and Add Worksheet
Create a new workbook and add a new worksheet using addWorksheet() method of Workbook.
let workbook = new Workbook();
let worksheet = workbook.addWorksheet('Car Data');
Add Row and format the fonts.
We will use addRow() method of worksheet object. to add a row in a worksheet. as below,
// Add new row
let titleRow = worksheet.addRow([title]);

// Set font, size and style in title row.
titleRow.font = { name: 'Comic Sans MS', family: 4, size: 16, underline: 'double', bold: true };

// Blank Row
worksheet.addRow([]);

//Add row with current date
let subTitleRow = worksheet.addRow(['Date : ' + this.datePipe.transform(new Date(), 'medium')]);
Add Image in worksheet
carlogo.js as below.
export const logoBase64 = "data:image/png;base64,iVBORw0KGgoAAAANSUhEUgAAAfQAAAFKCAMAAADcyF29AAABxVBMVEVHcEwJCAggFxEBAQE2KyQAAAA0LScAAAAAAAA1LysXEQ0EBAQFBAMDAwMLCQgGBQUFBAOEQhUHBwZjQSuScFoVFRZvNAx5NghcOyaudU8yMDBrNhOiViMZFhXEdD3Ef0+4ZzFISUdSJwliMA6BPA6lVR8CAgEDAgQPDhANDgsKCQoVFhPObi4SERS2VxcE.......";To use it in
generateExcel() method, We need to import carlogo.js in excel.service.ts as below,
import * as logoFile from './carlogo.js';Now, add an image in a worksheet as below,
let logo = workbook.addImage({
      base64: logoFile.logoBase64,
      extension: 'png',
});

worksheet.addImage(logo, 'E1:F3');
workbook.addImage(image) creates an image object and returns the image id, that image id we will use to place image in the worksheet using worksheet.addImage(imageId, cellRange).
The coordinates calculated from the range will cover from the top-left of the first cell to the bottom right of the second. Merge Cells
We can merge cells using worklist.mergeCells(cellRange) method, as below,
worksheet.mergeCells('A1:D2');
The coordinates calculated from the range will cover from the top-left of the first cell to the bottom right of the second.
Add Data with Header & Conditional Formatting
We will add a header row for car data records with a background color, as below,
//Add Header Row
let headerRow = worksheet.addRow(header);

// Cell Style : Fill and Border
headerRow.eachCell((cell, number) => {
  cell.fill = {
    type: 'pattern',
    pattern: 'solid',
    fgColor: { argb: 'FFFFFF00' },
    bgColor: { argb: 'FF0000FF' }
  }
  cell.border = { top: { style: 'thin' }, left: { style: 'thin' }, bottom: { style: 'thin' }, right: { style: 'thin' } }
});
ExcelJS directly doesn’t support conditional formatting, but we can achieve this functionality by assigning style based on required condition in angular, as below,
// Add Data and Conditional Formatting
data.forEach(d => {
  let row = worksheet.addRow(d);
  let qty = row.getCell(5);
  let color = 'FF99FF99';
  if (+qty.value < 500) {
    color = 'FF9999'
  }

  qty.fill = {
    type: 'pattern',
    pattern: 'solid',
    fgColor: { argb: color }
  }
}

);
Note: Using worklist.addRows(records: any[]) method we can add multiple rows. as an example,
worksheet.addRows(data);
But in our example, we want to perform cell styling based on a conditional check, So we have saved the individual row using worklist.addRow(record) method.
Same way, you can add other rows like footer and additional information.
Export file using FileSaver
Now our workbook is ready to export. We can export it using saveFile() method of file-saver, as shown below
workbook.xlsx.writeBuffer().then((data) => {
      let blob = new Blob([data], { type: 'application/vnd.openxmlformats-officedocument.spreadsheetml.sheet' });
      fs.saveAs(blob, 'CarData.xlsx');
});
Final Code Review
Note : I have added Generate Excel button in AppComponent which will call genetateExcel() method of excel.service.ts.
{
  "compileOnSave": false,
  "compilerOptions": {
    "baseUrl": "./",
    "outDir": "./dist/out-tsc",
    "sourceMap": true,
    "declaration": false,
    "moduleResolution": "node",
    "emitDecoratorMetadata": true,
    "experimentalDecorators": true,
    "target": "es5",
    "paths": {
      "exceljs": [
        "node_modules/exceljs/dist/exceljs.min"
      ]
    },
    "typeRoots": [
      "node_modules/@types"
    ],
    "lib": [
      "es2017",
      "dom"
    ]
  }
}
import { Component } from '@angular/core';
import { ExcelService } from './excel.service';
@Component({
selector: 'app-root',
templateUrl: './app.component.html',
styleUrls: ['./app.component.css']
})
export class AppComponent {
constructor(private excelService: ExcelService) {
}
generateExcel() {
this.excelService.generateExcel();
}
}
<button (click)="generateExcel()"> Generate Excel</button>
import { Injectable } from '@angular/core';
import { Workbook } from 'exceljs';
import * as fs from 'file-saver';
import * as logoFile from './carlogo.js';
import { DatePipe } from '../../node_modules/@angular/common';
@Injectable({
  providedIn: 'root'
})
export class ExcelService {


  constructor(private datePipe: DatePipe) {

  }

  generateExcel() {

    //Excel Title, Header, Data
    const title = 'Car Sell Report';
    const header = ["Year", "Month", "Make", "Model", "Quantity", "Pct"]
    const data = [
      [2007, 1, "Volkswagen ", "Volkswagen Passat", 1267, 10],
      [2007, 1, "Toyota ", "Toyota Rav4", 819, 6.5],
      [2007, 1, "Toyota ", "Toyota Avensis", 787, 6.2],
      [2007, 1, "Volkswagen ", "Volkswagen Golf", 720, 5.7],
      [2007, 1, "Toyota ", "Toyota Corolla", 691, 5.4],
      [2007, 1, "Peugeot ", "Peugeot 307", 481, 3.8],
      [2008, 1, "Toyota ", "Toyota Prius", 217, 2.2],
      [2008, 1, "Skoda ", "Skoda Octavia", 216, 2.2],
      [2008, 1, "Peugeot ", "Peugeot 308", 135, 1.4],
      [2008, 2, "Ford ", "Ford Mondeo", 624, 5.9],
      [2008, 2, "Volkswagen ", "Volkswagen Passat", 551, 5.2],
      [2008, 2, "Volkswagen ", "Volkswagen Golf", 488, 4.6],
      [2008, 2, "Volvo ", "Volvo V70", 392, 3.7],
      [2008, 2, "Toyota ", "Toyota Auris", 342, 3.2],
      [2008, 2, "Volkswagen ", "Volkswagen Tiguan", 340, 3.2],
      [2008, 2, "Toyota ", "Toyota Avensis", 315, 3],
      [2008, 2, "Nissan ", "Nissan Qashqai", 272, 2.6],
      [2008, 2, "Nissan ", "Nissan X-Trail", 271, 2.6],
      [2008, 2, "Mitsubishi ", "Mitsubishi Outlander", 257, 2.4],
      [2008, 2, "Toyota ", "Toyota Rav4", 250, 2.4],
      [2008, 2, "Ford ", "Ford Focus", 235, 2.2],
      [2008, 2, "Skoda ", "Skoda Octavia", 225, 2.1],
      [2008, 2, "Toyota ", "Toyota Yaris", 222, 2.1],
      [2008, 2, "Honda ", "Honda CR-V", 219, 2.1],
      [2008, 2, "Audi ", "Audi A4", 200, 1.9],
      [2008, 2, "BMW ", "BMW 3-serie", 184, 1.7],
      [2008, 2, "Toyota ", "Toyota Prius", 165, 1.6],
      [2008, 2, "Peugeot ", "Peugeot 207", 144, 1.4]
    ];

    //Create workbook and worksheet
    let workbook = new Workbook();
    let worksheet = workbook.addWorksheet('Car Data');


    //Add Row and formatting
    let titleRow = worksheet.addRow([title]);
    titleRow.font = { name: 'Comic Sans MS', family: 4, size: 16, underline: 'double', bold: true }
    worksheet.addRow([]);
    let subTitleRow = worksheet.addRow(['Date : ' + this.datePipe.transform(new Date(), 'medium')])


    //Add Image
    let logo = workbook.addImage({
      base64: logoFile.logoBase64,
      extension: 'png',
    });

    worksheet.addImage(logo, 'E1:F3');
    worksheet.mergeCells('A1:D2');


    //Blank Row
    worksheet.addRow([]);

    //Add Header Row
    let headerRow = worksheet.addRow(header);

    // Cell Style : Fill and Border
    headerRow.eachCell((cell, number) => {
      cell.fill = {
        type: 'pattern',
        pattern: 'solid',
        fgColor: { argb: 'FFFFFF00' },
        bgColor: { argb: 'FF0000FF' }
      }
      cell.border = { top: { style: 'thin' }, left: { style: 'thin' }, bottom: { style: 'thin' }, right: { style: 'thin' } }
    })
    // worksheet.addRows(data);


    // Add Data and Conditional Formatting
    data.forEach(d => {
      let row = worksheet.addRow(d);
      let qty = row.getCell(5);
      let color = 'FF99FF99';
      if (+qty.value < 500) {
        color = 'FF9999'
      }

      qty.fill = {
        type: 'pattern',
        pattern: 'solid',
        fgColor: { argb: color }
      }
    }

    );

    worksheet.getColumn(3).width = 30;
    worksheet.getColumn(4).width = 30;
    worksheet.addRow([]);


    //Footer Row
    let footerRow = worksheet.addRow(['This is system generated excel sheet.']);
    footerRow.getCell(1).fill = {
      type: 'pattern',
      pattern: 'solid',
      fgColor: { argb: 'FFCCFFE5' }
    };
    footerRow.getCell(1).border = { top: { style: 'thin' }, left: { style: 'thin' }, bottom: { style: 'thin' }, right: { style: 'thin' } }

    //Merge Cells
    worksheet.mergeCells(`A${footerRow.number}:F${footerRow.number}`);

    //Generate Excel File with given name
    workbook.xlsx.writeBuffer().then((data) => {
      let blob = new Blob([data], { type: 'application/vnd.openxmlformats-officedocument.spreadsheetml.sheet' });
      fs.saveAs(blob, 'CarData.xlsx');
    })

  }
}
Final Output
https://github.com/ngdevelop-tech/angular-6-export-an-excel-file
Note : This repository is upgraded to Angular 8.
In this article, we have seen, export an excel file in angular 8 using exceljs.
I hope you like this article, please provide your valuable feedback and suggestions in below comment section🙂.
For more updates, Follow us 👍 on NgDevelop Facebook page.