Angular Elements is one of the best feature released in Angular 6. It allows us to create a Web Components (Custom Elements) using an Angular.
Angular elements are ordinary Angular components packaged as custom elements, a web standard for defining new HTML elements in a framework-agnostic way
This approach let us develop reusable components in the way that’s familiar to us, and yet, embedding these in every kind of website (vanilla JavaScript, React, Vue, WordPress, etc. ).
Important features of Angular Elements:
- They are Self Bootstrapping.
- They actually host the Angular Component inside a Custom Element.
- It bridges between the DOM APIs and Angular Components.
- Anyone can use it without having the knowledge of how Angular works.
- Note
Custom elements are a Web Platform feature currently supported by Chrome, Opera, Safari, and available in other browsers through polyfills (see Browser Support). With a custom element, you can extend the set of available HTML tags. The content of this tag is then controlled by JavaScript code which is included in the page.
Angular Elements feature is available with @angular/elements package.
The @angular/elements package exports a createCustomElement() method that can be used to transform Angular Component as Custom Element. It provides a bridge from Angular’s component interface and changes detection functionality to the built-in DOM API.
In this article, we will see how to create custom web components / custom elements using angular elements with an example.
We will build one framework-vote custom element, where user an give Up vote and Down Vote, user can customize the title and logo for different framework.
We will use this custom element in external HTML file.
Step by Step Guide to
Build Custom Elements / Web Components
using Angular Elements
We will create a custom element in a separate project. Create a new project named angular-elements using Angular CLI.
Note : Use Angular CLI 6 to create Angular 6 Project.
ng new angular-elements
We will add Angular Elements functionality using new angular cli 6 command ng add.
ng add @angular/elements
By using this command we are adding the needed document-register-element.js polyfill and @angular/elements package.
We will transform ordinary Angular component to Custom Element using createCustomElement function of @angular/elements.
In our Custom Element, We will use Bootstrap 4 to design user interface.
Install bootstrap using the following command.
npm install --save bootstrap
We will implement a separate angular component, and later transform it into the custom element.
Create FrameworkVoteComponent using the following command.
ng generate component framework-vote
This command creates a separate framework-vote folder and generates following four files, also updates app.module.ts
- framework-vote.component.html
- framework-vote.component.css
- framework-vote.component.ts
- framework-vote.component.spec.ts
bootstrap.min.css available to framework-vote component add following import in framework-vote.component.css@import '~bootstrap/dist/css/bootstrap.min.css';
This is very important step to transform an ordinary component to custom element.
To use Angular Component as Custom Element we will step by step configure it on app.module.ts.
- Import
Injectorfrom@angular/corepackage andcreateCustomElementfrom@angular/elementspackage.import { Injector} from '@angular/core'; import { createCustomElement } from '@angular/elements'; FrameworkVoteComponentis not a part of any other component and is also not a root of an Angular application, so we need to specifically tell Angular to compile it: for this, we put it on theentryComponentslist of@NgModule.entryComponents : [ FrameworkVoteComponent ]- Transform
FrameworkVoteComponentto the custom elementexport class AppModule { constructor(private injector : Injector){ } ngDoBootstrap(){ const el = createCustomElement(FrameworkVoteComponent, {injector : this.injector}); customElements.define('framework-vote',el); } }as you can see in the above snippet we will bootstrap Angular Component as custom element in
ngDoBootstrap()method. - In
ngDoBootstrap()method callcreateCustomElement()function to transformFrameworkVoteComponentas Custom Element.
This function required two parameters- First, The Angular component which should be used to create the element.
- Second, A configuration object. This object needs to include the injector property which is set to the current
Injectorinstance.
- The next step is to register the newly created custom element in the browser. This is done by calling
customElements.define(). Please note that this is not Angular.
ThecustomElementsread-only property belongs to theWindowinterface and returns a reference to theCustomElementRegistryobject, which can be used to register new custom elements and get information about previously registered custom elements in the browser.
ThecustomElements.define()method requires two parameter.- The first parameter is of type string and contains the name of the element. Passing the string framework-vote means that the custom element
<framework-vote>will be registered and can be used in the HTML code. - The second parameter is the custom element which has been created before.
- The first parameter is of type string and contains the name of the element. Passing the string framework-vote means that the custom element
Now our component is transformed into Custom Element. now before we build the element, let’s implement FrameworkVoteComponent logic.
We need to make sure that the native Shadow DOM is used for the component, so that style encapsulation is done. This is done by setting the encapsulation property of the @Component decorator to ViewEncapsulation.Native. this property bundle styles in js file with the component’s template and logic.
Here we will create two input properties called title and logo and two output properties which will generate a like and dislike event. We will handle this event in external HTML as we do with ordinary HTML input controls.
Update FrameworkVoteComponent .ts and .html files as following code snippets.
import { Component, OnInit, ViewEncapsulation, Input, Output, EventEmitter } from '@angular/core';
@Component({
selector: 'app-framework-vote',
templateUrl: './framework-vote.component.html',
styleUrls: ['./framework-vote.component.css'],
encapsulation: ViewEncapsulation.Native
})
export class FrameworkVoteComponent implements OnInit {
@Input() logo : string;
@Input() title: string;
@Output() like = new EventEmitter();
@Output() dislike = new EventEmitter();
likeCount = 0;
dislikeCount = 0;
constructor() { }
ngOnInit() {
}
vote(type : string){
if(type==='like'){
this.likeCount++;
this.like.emit(this.likeCount);
}else{
this.dislikeCount++;
this.dislike.emit(this.dislikeCount);
}
}
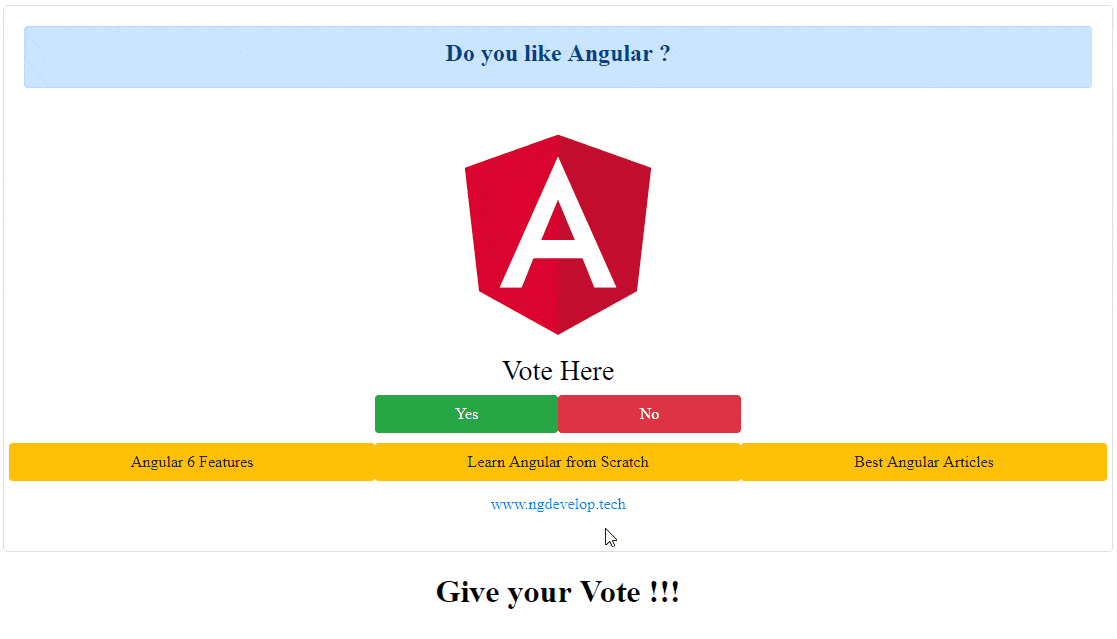
} <div class="container">
<div class="card text-center">
<div class="card-body">
<div class="alert alert-primary" role="alert">
<h4>
<strong>{{title}}</strong>
</h4>
</div>
<img [src]="logo">
<h3>Vote Here</h3>
<div class="row">
<button type="button" class="offset-md-4 col-md-2 btn btn-success" (click)="vote('like')">Yes</button>
<button type="button" class="col-md-2 btn btn-danger" (click)="vote('dislike')">No</button>
</div>
<div class="row" style="margin-top: 10px">
<a class="col-md-4 btn btn-warning" href="https://www.ngdevelop.tech/angular-6-features/" role="button">Angular 6 Features</a>
<a class="col-md-4 btn btn-warning" href="https://www.ngdevelop.tech/angular/get-started/" role="button">Learn Angular from Scratch</a>
<a class="col-md-4 btn btn-warning" href="https://www.ngdevelop.tech/blog/" role="button">Best Angular Articles</a>
</div>
<h2>
<a class="btn btn-link text-center" href="https://www.ngdevelop.tech/" role="button">www.ngdevelop.tech</a>
</h2>
</div>
</div>
</div> Now our custom element is ready to use. We can build this as regular production build and use generated files in any other external application.
But ng build --prod --output-hashing none generate multiple files as shown below
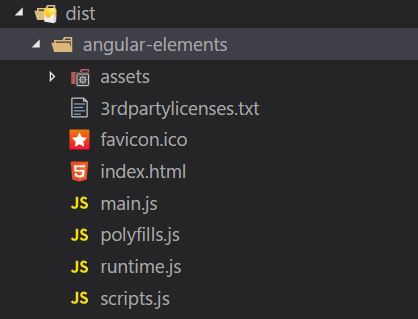
We want a single JS file for our custom element.
Unfortunately, the current release of Angular / Angular CLI is not offering special build functionality for Angular Elements. In future might, Angular CLI will come with Angular Element build.
For now, we’ll implement a custom build script that will build our custom element in one JS file.
Create Custom Element Build Script
We need to install two new dependencies for Angular Element build script. Install it using the following command
npm install fs-extra concat
- fs-extra : adds file system methods that aren’t included in the native
fsmoduleand adds promise support to the fs methods. - concat : concatenate multiple files
element-build.js in project folder.
const fs = require('fs-extra');
const concat = require('concat');
(async function build() {
const files = [
'./dist/angular-elements/runtime.js',
'./dist/angular-elements/polyfills.js',
'./dist/angular-elements/scripts.js',
'./dist/angular-elements/main.js',
]
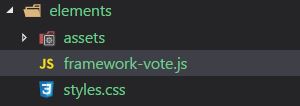
await fs.ensureDir('elements')
await concat(files, 'elements/framework-vote.js');
await fs.copyFile('./dist/angular-elements/styles.css', 'elements/styles.css')
await fs.copy('./dist/angular-elements/assets/', 'elements/assets/' )
})() This script performs following activities :
- Creates a new sub-folder
elementsinside the project folder - the JS files
runtime.js,polyfills.js,scripts.jsandmain.jsare concatenated into a new fileframework-vote.jsinside theelementsfolder styles.cssfrom the production build is copied to theelementsfolder- files from the
assetsfolder are copied to theelementsfolder
package.json which performs production build and then execute an element-build.jsAdd Script in package.json
{
  "scripts": {
   ...
    "build:elements": "ng build --prod --output-hashing none && node element-build.js"
    },
  }
}
This script first runs the production build command, after successful production build it will execute element-build.js which concatenate all file into a single framework-vote.js file.
Run Custom Build Command
Now we can build custom element into a framework-vote.js file using the following command as shown below.
npm run build:elements
We can now use framework-vote custom element in any external HTML file and framework using this framework-vote.js .
In elements folder, We will create an index.html file and we will use framework-vote custom element in an index.html as shown below
<!doctype html>
<html lang="en">
  <head>
    <title>Custom Angular Element</title>
  </head>
  <body>

    <framework-vote  logo="./assets/angular.png" title="Do you like Angular ?"></framework-vote>

    <h1 id="result" style="text-align: center" > Give your Vote !!!</h1>

    <script src="framework-vote.js"></script>

    <script>
        const vote = document.querySelector('framework-vote');
        const result = document.querySelector('#result');
        vote.addEventListener('like', (event)=> {
            console.log('You Liked Angular ...');
            result.innerHTML = "Up Vote :  " + event.detail;
            console.log(event);
        });

        vote.addEventListener('dislike',(event)=> {
            console.log('You Do not like Angular...');
            result.innerHTML = "Down Vote:  " + event.detail;
            console.log(event);
        });
    </script>
  </body>
</html>
As shown above, using framework-vote.js I can use framework-vote as a regular HTML tag.
I have handled the event generated from that custom element in a script tag and displayed the result in h1 tag.
Download this framework-vote.js from here and use it in your application for testing.
- Note
Here I am using http-server to run this external index.html page on a local server. you can run it on any other server also.
Install http-server using the following command.
npm install http-server -g
Clone the GIT Repository
Download framework-vote.js from above repository and use in your app.