
Nested Component
So far we have built applications with a two component, one is AppComponent and other one is ProductsComponent. our goal now is to start building applications that are composed of multiple components working together.
Breaking up an application into multiple logical components makes it easier to:
- Architect an application as it grows in complexity.
- Re-use common components in multiple places.
So in our application, instead of showing product list in the tabular form we will display each product with a different component called ProductComponent. ProductComponent will be the child component of ProductsComponent, that is also known as the Nested Component.
Don’t confuse here, ProductComponent represents individual product object, while ProductsComponent represents the list of products.
So ProductsComponent will be the parent component of ProductComponent.
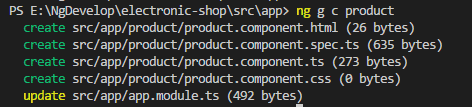
Excecute below command on terminal.
ng g c product
As shown below, this command will generate one product folder and in that folder, four files are created, also app.module.ts will be updated.
Create one product property as below in product.component.ts
product: Product; // product property of Type Product.
We will use product property to display product information on a screen.
Replace product.component.html with below code,
<div class="card bg-secondary text-white">
  <div class="card-body">
    <h4 class="card-title">{{product.title}}</h4>
    <h5 class="card-text">{{product.price|currency:'INR'}}</h5>
  </div>
  <table class="table">
    <tr>
      <td scope="row">
        <b>Product Type</b>
      </td>
      <td>
        <i class="fa fa-laptop fa-2x" aria-hidden="true" *ngIf="product.productType=='Laptop'"></i>
        <i class="fa fa-mobile fa-2x" *ngIf="product.productType=='Mobile'" aria-hidden="true"></i>
      </td>
    </tr>
    <tr>
      <td scope="row">
        <b>Brand</b>
      </td>
      <td>{{product.brand}}</td>
    </tr>
  </table>
</div>
In above template, We have displayed the Product Title, Product Price and Brand using interpolation as {{product.productTitle}},{{product.price|currancy:'INR'}} and {{product.brand}} respectively.
- Font Awsome Icon
<i class="fa fa-laptop fa-2x" aria-hidden="true"></i>
This code will display an icon for a laptop. Same way use other font awesome icons.
I have used here, two font awesome classes ‘fa fa-laptop fa-2x‘ and ‘fa fa-mobile fa-2x‘ to display laptop and mobile icon.
- Tip
If you have installed Bootstrap and Font Awesome Snippets Extension then, just write fa-<icon-name> on an html page, and it will generate the icon code for you.
For example to generate address-book icon, just write fa-address-book.
In above code, we have used *ngIf.
<i class="fa fa-laptop fa-2x" aria-hidden="true" *ngIf="product.productType=='Laptop'"></i>
*ngIf is the structural directive. which is used to change the structure of DOM based on condition.
If the condition is true, then HTML tag will load in DOM.
You can use *ngIf with any HTML tag as well as with Angular Component selectors. like <div>, <input>, <i>, <products> etc.
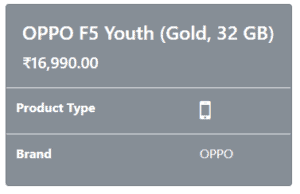
a product.component.html template will display product information as below.
But note that we will not able to see above component because to display any component on screen, we have to use a selector of that component in parent component.
So to display ProductComponent as a part of ProductsComponent, we need to add <app-product> selector of ProductComponent in products.component.html.
Replace products.component.html with below code,
<div class="card" >
  <div class="card-body">
    <h4 class="card-title">Products</h4>
    <div class="row">
      <app-product style="margin-bottom: 10px" class="col-md-3" *ngFor="let p of products"></app-product>
    </div>
  </div>
</div>
If we ran the application now we would see just some empty boxes with some errors in the console, like so:
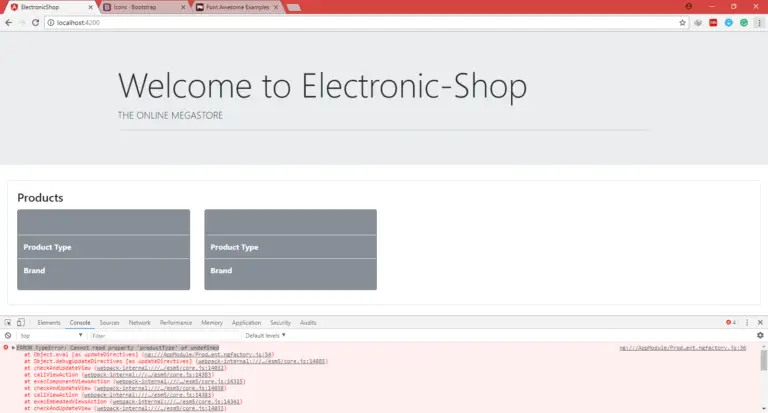
Because product property of ProductComponent is not initialized yet as well as we are not passing product data from our parent ProductsComponent to the child ProductComponent.
To send product data in ProductComponent, from parent component we need to use Property Binding.
As you have seen in above code, In ProductComponent class we do have a property called product:
And we are looping and creating products in our ProductsComponent, like so:
<app-product class="col-md-3" *ngFor="let p of products"></app-product>
But we are not setting the property product of our ProductComponent to anything, which is why it’s undefined.
<app-product class="col-md-3" [product]="p" *ngFor="let p of products"></app-product>
Even though our ProductComponent has a product property we can’t bind to it using the [] syntax, we need to explicitly mark it as an Input property on our ProductComponent.
We do this by pre-pending the product property in the component with a new annotation called @Input, as below :
import { Component, OnInit, Input, EventEmitter, Output } from '@angular/core';
class ProductComponent{
   @Input() product: Product;
   ...
}
This tells Angular that the product property is an input property and therefore in HTML we can bind to it using the [] input property binding syntax.
This @Input now becomes part of the public interface of our component.
Lets say at some future point we decided to change the product property of our ProductComponent to perhaps just data, like so:
class ProductComponent {
  @Input() data: Product;
  ...
}
Because this input is part of the public interface for our component we would also need to change all the input property bindings everywhere our component is used, like so:
<app-product class="col-md-3" [data]="p" *ngFor="let p of products"></app-product>
Not a great thing to ask the consumers of your component to have to do.
This is a common problem so to avoid expensive refactors the @Input annotation takes a parameter which is the name of the input property to the outside world, so if we changed our component like so:
class ProductComponent{
   @Input('product') data: Product;
   ...
}
To the outside world, the input property name is still product and we could keep the ProductsComponent template the same as before:
<app-product class="col-md-3" [product]="p" *ngFor="let p of products"></app-product>
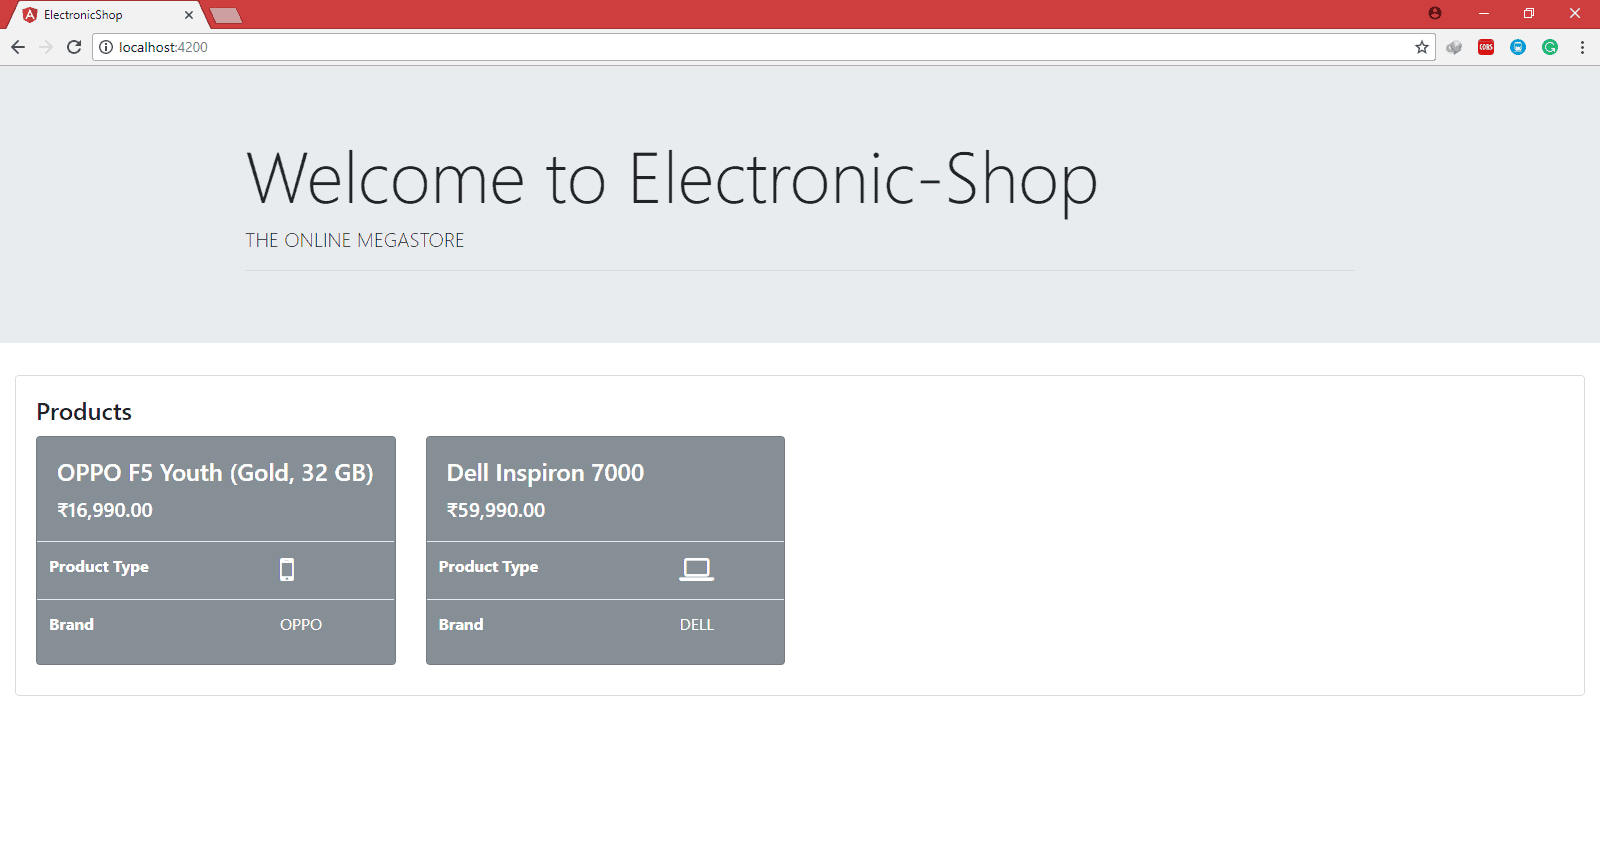
Now once browser refresh, the output would be like :
To send an input to the child component from the parent component we have use the @Input directive.
But what if child component generates a custom event and it needs to inform this custom event to the parent component.
To create a custom event on child component we need two things,
- Create an EventEmitter property on the child component called
ProductComponent. - Similar to input property binding, we need to annotate that property with the
@Outputdecorator.
- Note
An EventEmitter is a helper class which we can use to emit events when something happens, other components can then bind and react to these events.
Create one Remove button on ProductComponent template. as shown below :
<button type="button" class="btn btn-danger"> Remove </button>
We will create one event called removed in ProductComponent class.
import { Component, OnInit, Input, EventEmitter, Output } from '@angular/core';
class ProductComponent{
  @Output() removed = new EventEmitter();
  ...
  delete() {
    this.removed.emit(this.product);
  }
  ...
}
As you can see above, I have created one removed property which will generate an event. I have created one delete() method which is a click event handler of Remove button.
Once you click on the Remove button this will call the delete() method. In delete() method we will emit an event using removed property. We will send the product object which we want to remove as a parameter of emit() method. as shown,
this.removed.emit(this.product);
We need to handle this output removed event on our parent component.
That we can do by adding (removed)="deleteProduct($event)" in the <app-product> </app-product> tag of an products.component.html
As shown below.
<app-product class="col-md-3" [product]="p" (removed)="deleteProduct($event)" *ngFor="let p of products"></app-product>
- Note
A $event is the object which we have received from the child component called ProductComponent.
As you can see above, we receive the removed event here, but to handle this event in ProductsComponent we need to create deleteProduct() method. as shown
class ProductsComponent{
  ...
  deleteProduct(product: Product) {
      let index = this.products.indexOf(product);
      if (index !== -1) {
        this.products.splice(index, 1);
      }
   }
} - Note
let is used to create a local variable inside the method or constructor. For example let temp=5;
This method first check the product is available or not in the list using indexOf() of an array.
If indexOf() method return -1 then product is not available. Otherwise it will return the index of the element.
Once we find the index, we can remove the element from an array using splice() method of an array. In splice method we need to pass the index from which we want to remove, and then no. of elements we want to remove, as show above splice(index,1) method will remove one element from given index.
import { MockData } from './../mock-data/mock-product-data';
import { Component, OnInit } from '@angular/core';
import { Product } from '../models/product';

@Component({
  selector: 'app-products',
  templateUrl: './products.component.html',
  styleUrls: ['./products.component.css']
})
export class ProductsComponent implements OnInit {

  products: Product[] = [];

  constructor() {
    this.products = MockData.Products;
  }

  ngOnInit() {
  }

  deleteProduct(product: Product) {
    let index = this.products.indexOf(product);
    if (index !== -1) {
      this.products.splice(index, 1);
    }
  }

}
<div class="card" >
  <div class="card-body">
    <h4 class="card-title">Products</h4>
    <div class="row">
      <app-product class="col-md-3" [product]="p" (removed)="deleteProduct($event)" *ngFor="let p of products"></app-product>
    </div>
  </div>
</div>
import { Product } from './../models/product';
import { Component, OnInit, Input, EventEmitter, Output } from '@angular/core';

@Component({
  selector: 'app-product',
  templateUrl: './product.component.html',
  styleUrls: ['./product.component.css']
})
export class ProductComponent implements OnInit {

  @Input() product: Product;
  @Output() removed = new EventEmitter<Product>();

  constructor() { }

  ngOnInit() {
  }

  delete() {
    this.removed.emit(this.product);
  }

}
<div class="card bg-secondary text-white">
  <div class="card-body">
    <h4 class="card-title">{{product.title}}</h4>
    <h5 class="card-text">{{product.price|currency:'INR'}}</h5>
  </div>
  <table class="table">
    <tr>
      <td scope="row">
        <b>Product Type</b>
      </td>
      <td>
        <i class="fa fa-laptop fa-2x" aria-hidden="true" *ngIf="product.productType=='Laptop'"></i>
        <i class="fa fa-mobile fa-2x" *ngIf="product.productType=='Mobile'" aria-hidden="true"></i>
      </td>
    </tr>
    <tr>
      <td scope="row">
        <b>Brand</b>
      </td>
      <td>{{product.brand}}</td>
    </tr>
  </table>
  <div class="card-footer text-muted">
    <button type="button" class="btn btn-danger" (click)="delete()" >Remove</button>
  </div>
</div> 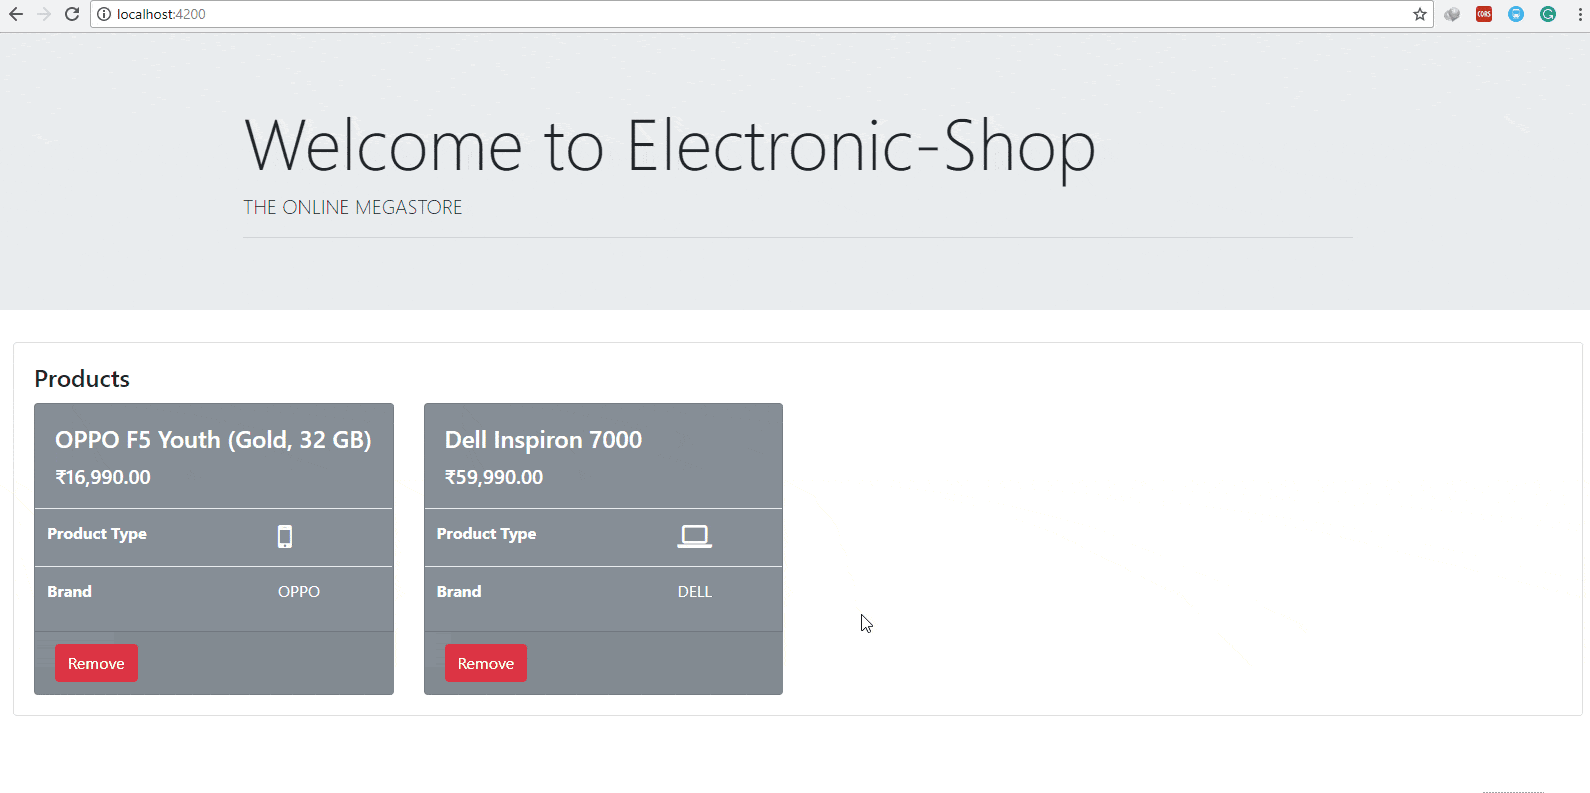
In this chapter,
- We have seen the purpose of nested component, and then we have created nested component.
- We have created one nested component called ProductComponent.
- After that, we have seen the way to communicate between parent component to child component.
- We can pass the data from parent component to child component using @Input Directive in child component with Property Binding in parent component.
- As well as, to emit an event from child component we need to use @Output Directive.