
Angular Forms
Forms are the important part of any application. Forms are generally used to receive data from the user.
For example, Registration Form, Login Form, Contact Form etc.
In angular, you can work with forms using below two approach
- Template driven Forms
- Model Driven Forms
We will see both the approach by creating one component to add a product to the product array.
We will see the same form function with two different component one using model-driven forms approach and one using the template driven forms approach.
We will also see the form validation before submitting the form for both the approach.
We will display error message based on the error type like required, minlength, pattern etc.
Although the template-driven approach is simpler, behind the scenes it’s actually the model-driven approach with the models automatically creating for you.
So first we will create the form using the model driven approach and later on, we will create the same type of form using the template-driven approach.
Let’s start Step By Step…
First of all, create a new component called AddProductModelComponent using below command on terminal.
Here, I have used the ‘Model’ in component name, to differentiate it as a Model Driven Form.
ng g c add-product-model

This will generate four files as you can see above and update declaration part of a module.
Now to display this component of screen add selector of AddProductModelComponent in app.component.html. as shown below
<div class="jumbotron jumbotron-fluid">
  <div class="container">
    <h1 class="display-3">Welcome to Electronic-Shop</h1>
    <p class="lead">THE ONLINE MEGASTORE</p>
    <hr class="my-2">
  </div>
</div>
<div class="container-fluid">
  <app-add-product-model>Loading</app-add-product-model>
</div>
In above code, I have replaced app-products selector with app-add-product-model selector. This will display AddProductModelComponent on screen.
Now, lets setup the form
Either we work with the model-driven form or template driven, we need some basic form HTML to start with.
- Note
In model-driven forms questioning to what you might think the HTML for our form isn’t automatically created for us.
We still need to write the HTML that represents our form and then explicitly link the HTML form elements to code on our component.
So first create simple HTML form in the add-product-model.component.html as shown below,
<div class="card">
  <div class="card-body">
    <h4 class="card-title">ADD PRODUCT (Model Driven Form)</h4>
    <div class="row">

      <div class="col-md-6">
        <form novalidate>
          <div class="form-group">
            <label>Title</label>
            <input type="text" class="form-control">
          </div>
          <div class="form-group ">
            <label>Model Name</label>
            <input type="text" class="form-control">
          </div>
          <div class="form-group ">
            <label>Color</label>
            <input type="text" class="form-control">
          </div>
          <div class="form-group ">
            <label>Product Type</label>
            <select class="form-control">
              <option *ngFor="let p of productTypes" [value]="p">{{p}}</option>
            </select>
          </div>
          <div class="form-group ">
            <label>Brand</label>
            <input type="text" class="form-control">
          </div>
          <div class="form-group">
            <label>Price</label>
            <input type="text" class="form-control">
          </div>
          <button type="submit" class="btn btn-primary">Submit</button>
          <button class="btn btn-default">Reset</button>
        </form>
      </div>

    </div>
  </div>
</div>
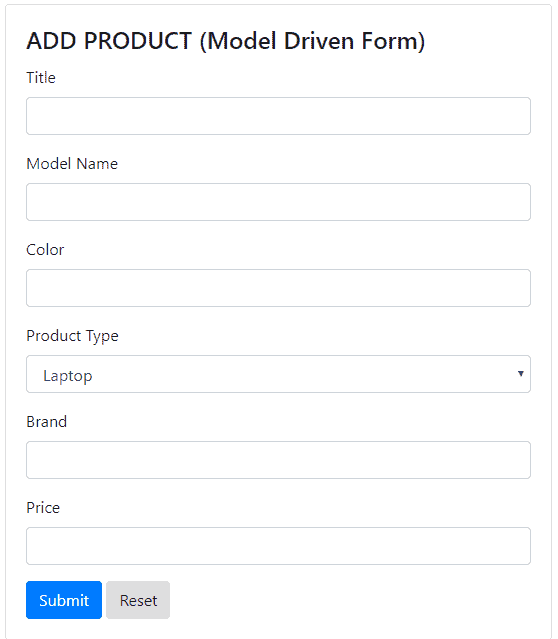
This will look as below Form.
- Note
We’ve added the novalidate attribute to the form element because by default browsers perform their own validation and show their own error popups.
Since we want to handle the form validation ourselves we can switch off this behavior by adding novalidate to the form element.
We want the select box to select the list of product types for the user to select.
We can hardcode this list, but later on, whenever we need to update Product Type list we need to add extra tags.
Instead of this, we can make this dynamic by creating an array of productTypes inside the component. Using it in the template as shown below.
<select class="form-control">
     <option *ngFor="let p of productTypes" [value]="p">{{p}}</option>
</select>
Form setup is complete, now we will create a Form Model and link this to the HTML form.
We represent the form as a model composed of FormGroups and FormControls
import { Component, OnInit } from '@angular/core';
import { FormGroup, FormControl } from '@angular/forms';
@Component({
  selector: 'app-add-product-model',
  templateUrl: './add-product-model.component.html',
  styleUrls: ['./add-product-model.component.css']
})
export class AddProductModelComponent implements OnInit {

  productTypes = ['Laptop', 'Mobile'];

  myForm: FormGroup;

  title: FormControl;
  modelName: FormControl;
  color: FormControl;
  productType: FormControl;
  brand: FormControl;
  price: FormControl;

  constructor() { }

  ngOnInit() {

    this.title = new FormControl();
    this.modelName = new FormControl();
    this.color = new FormControl();
    this.productType = new FormControl();
    this.brand = new FormControl();
    this.price = new FormControl();

    this.myForm = new FormGroup({
      'title': this.title,
      'modelName' : this.modelName,
      'productType' : this.productType,
      'color': this.color,
      'brand': this.brand,
      'price': this.price
    });

  }

}
As you can see above, we have created one myForm property of type FormGroup, which represents our whole form.
You can also create a nested form group. For example, you can divide the address field into multiple fields like street, city, pin no, in one FormGroup called address and add this FormGroup in parent form called myForm.
We have created different FormControls which will represent the individual HTML control.
Form control name can be different from the property name of the product object. But for the easy to remember I have used the same name.
Before we create the FormGroup we will initialize each FormControl.
- Note
It is not mandatory to create individual form control object, we can also create the FormGroup using below code.
this.myForm = new FormGroup({
      'title': new FormControl(),
      'modelName' : new FormControl(),
      'productType' : new FormControl(),
      'color': new FormControl(),
      'brand': new FormControl(),
      'price': new FormControl()
    });
If you are using this way, then there is no need to create a separate FormControls.
But we need not have direct access to the validation properties like, valid, invalid, dirty, pristine, touched and untouched.
If we are using this approach, to access this validation property we need to go through the myForm.controls.title.valid during the validation time.
We don’t have individual control over title FormControl.
So for the purpose of individual control over form control, I prefer the creation of individual FormControl inside the component.
We will do Form Linking using a number of directives which are found in the ReactiveFormsModule
Lets import ReactiveFormsModule and add it to the imports on our @NgModule.
Add below import in app.module.ts
import { ReactiveFormsModule } from '@angular/forms';
  ...
@NgModule({
  ...
  imports: [
     ReactiveFormsModule
  ]
  ...
})
export class AppModule { }
Now, we will bind myForm property with the <form> element on the template. To do this we need to use [formGroup] directive on the add-product-model.componet.html, as shown below
<form [formGroup]=”myForm”> … </form>
Now, we have linked the myForm model to the form template. We have access to our myForm model in our template.
The value property of myForm model returns value of all of its form control as an object.
We can use that object with JSON pipe to display some useful debug information about our form. As shown below.
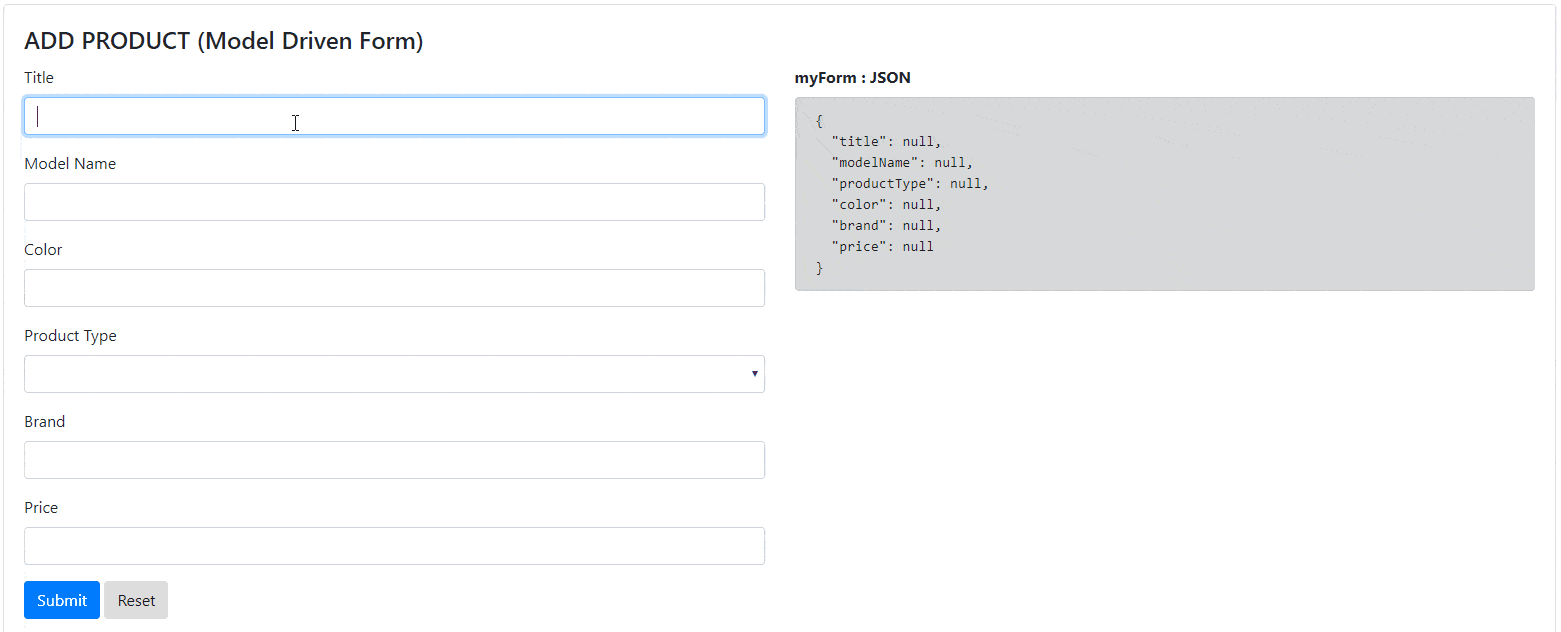
<pre > {{myForm.value | json}} </pre> Now if you run your application you will get the JSON as below.
{
  "title": null,
  "modelName": null,
  "productType": null,
  "color": null,
  "brand": null,
  "price": null
}
Initially, this looks quite exciting but as we enter values into each of the input fields in our form we would see that the model isn’t getting updated, the values remain null.
This is because we have linked the myForm model with the template form, this doesn’t automatically link the form control, and we need to link each FormControl with the related template form control.
We need to do this explicitly with the formControlName and formGroupName directives.
We will use formControlName directive to map form control property with the template form control, as shown below for the title form control property.
<div class="form-group">
      <label>Title</label>
      <input type="text" class="form-control" formControlName="title">
</div>
Now once a page is reloaded, enter the value in the title input field, you will see that title field of myForm JSON is changing. So title property is linked with template form control.
Same way will link each FormControl in the component with related HTML form control.
- Note
For, formControlName=”<name>”, here the <name> is the name using which you create a FormGroup, instead of the name of FormControl.
For Example,
…
titleControl = new FormControl();
…
ngOnInit(){
  this.myForm = new FormGroup({
  ‘title’ : this.titleControl,
…
});
}
For this code, <name> in the formControlName is ‘title’ instead of ‘titleControl’ as shown below
<input type="text" class="form-control" formControlName="title">
Sometimes, One property is a combination of multiple child Properties.
For Example, address field can be a combination of multiple child properties like street, city, state
We can represent this type of property with Nested FormGroup. as shown below :
this.myForm = new FormGroup({
        'address' : new FormGroup({
            'street' : new FormControl(),
            'city' : new FormControl()
        }),
        ...
});
If you are using nested FormGroup, then you need to link that parent FormGroup with the template form group using formGroupName directive.
As shown below,
<form [formGroup]="myForm">
  <div formGroupName="address">
    <div class="form-group ">
      <label>Street</label>
      <input type="text" class="form-control" formControlName="stree">
    </div>
    <div class="form-group ">
      <label>City</label>
      <input type="text" class="form-control" formControlName="city">
    </div>
  </div>
</form>
Here, you need to combine form control of nested form group inside <div> or <fieldset>
Finally, each FormControl is linked with the template form control.
import { Component, OnInit } from '@angular/core';
import { FormGroup, FormControl } from '@angular/forms';
@Component({
  selector: 'app-add-product-model',
  templateUrl: './add-product-model.component.html',
  styleUrls: ['./add-product-model.component.css']
})
export class AddProductModelComponent implements OnInit {
  productTypes = ['Laptop', 'Mobile'];
  myForm: FormGroup;
  title: FormControl;
  modelName: FormControl;
  color: FormControl;
  productType: FormControl;
  brand: FormControl;
  price: FormControl;
  constructor() { }
  ngOnInit() {
    this.title = new FormControl();
    this.modelName = new FormControl();
    this.color = new FormControl();
    this.productType = new FormControl();
    this.brand = new FormControl();
    this.price = new FormControl();
    this.myForm = new FormGroup({
      'title': this.title,
      'modelName' : this.modelName,
      'productType' : this.productType,
      'color': this.color,
      'brand': this.brand,
      'price': this.price
    });
  }
}
import { ProductService } from './service/product.service';
import { BrowserModule } from '@angular/platform-browser';
import { NgModule } from '@angular/core';
import { AppComponent } from './app.component';
import { ProductsComponent } from './products/products.component';
import { ProductComponent } from './product/product.component';
import { ReactiveFormsModule } from '@angular/forms';
@NgModule({
declarations: [
AppComponent,
ProductsComponent,
ProductComponent,
AddProductModelComponent
],
imports: [
BrowserModule,
ReactiveFormsModule
],
providers: [ProductService],
bootstrap: [AppComponent]
})
export class AppModule { }<div class="card">
<div class="card-body">
<h4 class="card-title">ADD PRODUCT (Model Driven Form)</h4>
<div class="row">
<div class="col-md-6">
<form [formGroup]="myForm" novalidate>
<div class="form-group">
<label>Title</label>
<input type="text" class="form-control" formControlName="title">
</div>
<div class="form-group ">
<label>Model Name</label>
<input type="text" class="form-control" formControlName="modelName">
</div>
<div class="form-group ">
<label>Color</label>
<input type="text" class="form-control" formControlName="color" >
</div>
<div class="form-group ">
<label>Product Type</label>
<select class="form-control" formControlName="productType" >
<option *ngFor="let p of productTypes" [value]="p">{{p}}</option>
</select>
</div>
<div class="form-group">
<label>Brand</label>
<input type="text" class="form-control" formControlName="brand">
</div>
<div class="form-group">
<label>Price</label>
<input type="number" class="form-control" formControlName="price" >
</div>
<button type="submit" class="btn btn-primary">Submit</button>
<button class="btn btn-default">Reset</button>
</form>
</div>
<div class="col-md-6">
<label>
<strong>myForm : JSON</strong>
</label>
<pre class="alert alert-dark">{{myForm.value | json}}</pre>
</div>
</div>
</div>
</div>
In this chapter, We have seen
- The purpose of forms in the application.
- Model Driven Forms approach.
- Form Setup
- Add Product Form Model
- We have linked the HTML form with FormGroup
- Use of Form Directives:
formControlNameandformGroupName - Example of Nested FormGroup