Client-side PDF Generation in Angular 13 with PDFMake
Generating reports, invoices, blog content, documents, guidelines, forms, etc in PDF form is a common use case of any business application.
There are various ways to generate PDFs in web applications,
On the client-side, We can generate PDF in the following ways,
window.print() functionwindow.print() to save it as PDF. though this approach is not useful when we want to generate custom PDF (not the same as a web page).In this article, we will use JavaScript Library to generate PDF in the browser.
In this article, we will use PDFMake to export a PDF in an angular application. We will create the Invoice Generator Angular application with PDFMake. In this app, We will get the invoice details from the form and generate the PDF.
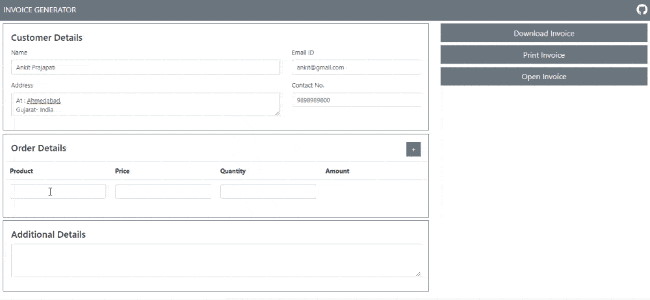
We will also demonstrate the various features of PDFMake like columns, table, list, QR code, Custom Styles. At the end of this article, our application will look like this,
Before we start with application development let’s see an introduction about PDFMake.
PDFMake is a popular client-side and server-side pdf generation javascript library. It provides various features like adding tables, columns, lists, links, images, styling, headers/footers, document meta-information, and all other important PDF generation features.
It also provides some extraordinary features like adding QR Code, Watermark, Table of Content, Encryption and Access Privileges.
PDFMake has around 9.8 K stars and 1.8 K forks on GitHub.
Now, let’s see How to generate PDF with PDFMake in Angular using the Invoice Generator demo application.
Let’s start with a step-by-step implementation of client-side pdf generation in angular.
We will create a new angular application using the following Angular CLI command.
Note: If you want to generate PDF in your existing application then skip this step.
ng new [application-name]
Execute the following command to Install the PDFMake library.
npm install --save pdfmake
Once it is installed, to use PDFMake in the browser we need to import pdfmake.js and vfs_fonts.js file. Add the following statements on top of the component or service where you want to use PDFMake.
In our application, we will generate a PDF in the AppComponent. So we will add the following two statements on top of the AppComponent.
import pdfMake from "pdfmake/build/pdfmake";
import pdfFonts from "pdfmake/build/vfs_fonts";
pdfMake.vfs = pdfFonts.pdfMake.vfs;
PDFMake follows the declarative approach. It means you’ll never have to calculate positions manually or use commands like writeText(text, x, y), moveDown etc…, as you would with a lot of other libraries. – From PDFMake Official Document
The most fundamental concept to be mastered is the document definition object. The document definition object is a kind of JSON object where you provide all your PDF configuration with different keys. Like content, column, table, ul, image, style, etc.
For example, we can generate a simple PDF with header and content as follows
import { Component } from '@angular/core';

import pdfMake from "pdfmake/build/pdfmake";
import pdfFonts from "pdfmake/build/vfs_fonts";
pdfMake.vfs = pdfFonts.pdfMake.vfs;

export class AppComponent {

  generatePDF() {
    let docDefinition = {
      header: 'C#Corner PDF Header',
      content: 'Sample PDF generated with Angular and PDFMake for C#Corner Blog'
    };

    pdfMake.createPdf(docDefinition).open();
  }
}
<button (click)="generatePDF()">Generate PDF</button>
In generatePDF() we have added a simple document definition object to generate a simple PDF. pdfMake has createPdf(docDefinition) method to create PDF from document definition object and open() method to open created PDF in browser. It also has other inbuilt methods to download and print PDFs.
pdfMake.createPDF(docDefinition).open();
pdfMake.createPDF(docDefinition).download();
pdfMake.createPDF(docDefinition).print();
So now when you will click on Generate PDF button, you will get PDF as below
If you can generate this PDF then Great ✨✨✨. You have successfully set up the PDFMake in Angular application. If you are facing any issue then check the above steps again, if it is not resolved comment in the below comment section.
Our basic application setup is done. Now let’s start with building an invoice generator application.
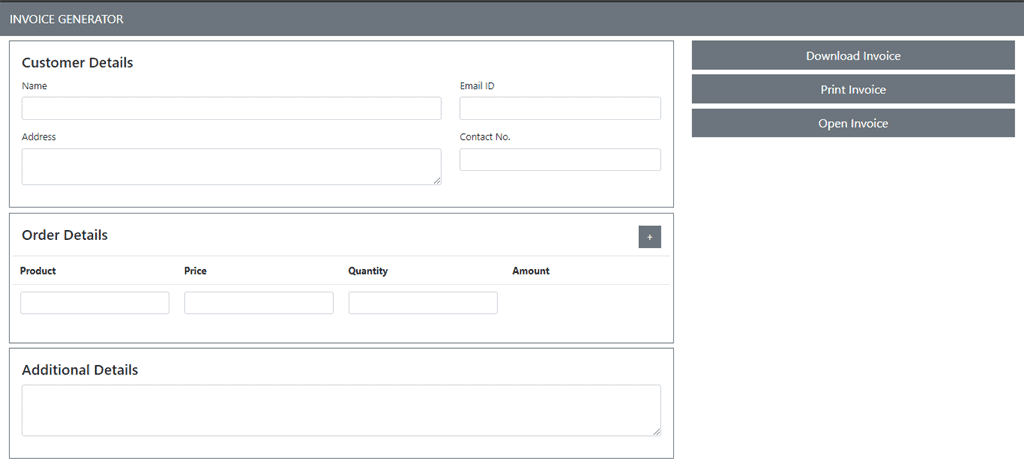
We will first design the invoice form in app.component.html, from where we will get the customer details, order details, and additional details.
This page will also have three buttons – Download Invoice, Print Invoice, and Open Invoice.
<!-- app.component.html : Invoice Form UI -->

<nav class="navbar navbar-expand-sm navbar-dark bg-secondary">
    <a class="navbar-brand" href="#">INVOICE GENERATOR</a>
</nav>

<div class="container-fluid pt-2">
    <div class="row">
        <div class="col-md-8">
            <div class="card border-secondary">
                <div class="card-body">
                    <h4 class="card-title">Customer Details</h4>
                    <div class="row">
                        <div class="col-md-8">
                            <div class="form-group">
                                <label for="name">Name</label>
                                <input type="text" class="form-control" name="name" id="name">
                            </div>
                            <div class="form-group">
                                <label for="address">Address</label>
                                <textarea class="form-control" name="address" id="address" row="3"></textarea>
                            </div>
                        </div>
                        <div class="col-md-4">
                            <div class="form-group">
                                <label for="email">Email ID</label>
                                <input type="email" class="form-control" name="email" id="email">
                            </div>
                            <div class="form-group">
                                <label for="contactNo">Contact No.</label>
                                <input type="number" class="form-control" name="contactNo" id="contactNo">
                            </div>
                        </div>
                    </div>
                </div>
            </div>
            <div class="card border-secondary mt-2">
                <div class="card-body">
                    <h4 class="card-title d-flex justify-content-between">Order Details <button type="button"
                            class="btn btn-secondary">+</button></h4>
                    <div class="row">
                        <table class="table">
                            <thead>
                                <tr>
                                    <th width="25%">Product</th>
                                    <th width="25%">Price</th>
                                    <th width="25%">Quantity</th>
                                    <th width="25%">Amount</th>
                                </tr>
                            </thead>
                            <tbody>
                                <tr>
                                    <td scope="row">
                                        <input type="text" class="form-control" name="productName" id="productName">
                                    </td>
                                    <td>
                                        <input type="number" class="form-control" name="price" id="price">
                                    </td>
                                    <td>
                                        <input type="number" class="form-control" name="quantity" id="quantity">
                                    </td>
                                    <td></td>
                                </tr>
                            </tbody>
                        </table>
                    </div>
                </div>
            </div>
            <div class="card border-secondary mt-2">
                <div class="card-body">
                    <h4 class="card-title">Additional Details</h4>
                    <div class="form-group">
                        <textarea class="form-control" name="additionalDetails" rows="3"></textarea>
                    </div>
                </div>
            </div>

        </div>
        <div class="col-md-4">
            <button type="button" name="" class="btn btn-secondary btn-lg btn-block">Download Invoice</button>
            <button type="button" name="" class="btn btn-secondary btn-lg btn-block">Print Invoice</button>
            <button type="button" name="" class="btn btn-secondary btn-lg btn-block">Open Invoice</button>
        </div>
    </div>
</div> We will create an invoice object in AppComponent and bind it with invoice form using two-way data binding. We will add addProduct() method to add product in invoice and update generatePdf() method to get action argument and execute the related pdfMake method.
/*** app.component.ts  ***/

// ...

class Product{
  name: string;
  price: number;
  qty: number;
}
class Invoice{
  customerName: string;
  address: string;
  contactNo: number;
  email: string;

  products: Product[] = [];
  additionalDetails: string;

  constructor(){
    // Initially one empty product row we will show
    this.products.push(new Product());
  }
}
@Component({
  selector: 'app-root',
  templateUrl: './app.component.html',
  styleUrls: ['./app.component.css']
})
export class AppComponent {
  invoice = new Invoice();

  generatePDF(action = 'open') {

    let docDefinition = {
        header: 'C#Corner PDF Header',
        content: 'Sample PDF generated with Angular and PDFMake for C#Corner Blog'
      };

    if(action==='download'){
      pdfMake.createPdf(docDefinition).download();
    }else if(action === 'print'){
      pdfMake.createPdf(docDefinition).print();
    }else{
      pdfMake.createPdf(docDefinition).open();
    }

  }

  addProduct(){
    this.invoice.products.push(new Product());
  }

}
Now let’s configure the document definition object to generate the PDF in the required layout and format.
We will update docDefinition object in generatePDF() method as below to show Invoice Header. To add multiple lines in PDF, we can use the content property of the document definition object as an array form, as shown below. We have also added some styling here.
let docDefinition = {
    content: [
      {
        text: 'ELECTRONIC SHOP',
        fontSize: 16,
        alignment: 'center',
        color: '#047886'
      },
      {
        text: 'INVOICE',
        fontSize: 20,
        bold: true,
        alignment: 'center',
        decoration: 'underline',
        color: 'skyblue'
      }
} The way we write common CSS with .class in CSS file, and apply it at multiple places on HTML file, in the same way pdfMake allows us to create common styles, which we can use on multiple lines. For example, we will create here a section header line and create a common style for the same.
let docDefinition = {
    content: [
        // Previous configuration
        {
            text: 'Customer Details',
            style: 'sectionHeader'
        }
    ],
    styles: {
        sectionHeader: {
            bold: true,
            decoration: 'underline',
            fontSize: 14,
            margin: [0, 15, 0, 15]
        }
    }
}
As you can see here, we have created a common style in styles property of document definition object and used it on customer details line with the style property.
We can add columns in pdf with columns property of PDFMake as shown below. For this application we will create two columns, in one column we will show customer details and in another column, we will show the current date and random bill number.
let docDefinition = {
    content: [
        // Previous configuration
        {
            columns: [
                [
                    {
                        text: this.invoice.customerName,
                        bold: true
                    },
                    { text: this.invoice.address },
                    { text: this.invoice.email },
                    { text: this.invoice.contactNo }
                ],
                [
                    {
                        text: `Date: ${new Date().toLocaleString()}`,
                        alignment: 'right'
                    },
                    {
                        text: `Bill No : ${((Math.random() * 1000).toFixed(0))}`,
                        alignment: 'right'
                    }
                ]
            ]
        },
    ],
    // Common Styles
} We can create a table in PDF with table property of the document definition object. We will show order products in table form as shown below :
let docDefinition = {
    content: [
        // Previous configuration
        {
            text: 'Order Details',
            style: 'sectionHeader'
        },
        {
            table: {
                headerRows: 1,
                widths: ['*', 'auto', 'auto', 'auto'],
                body: [
                    ['Product', 'Price', 'Quantity', 'Amount'],
                    ...this.invoice.products.map(p => ([p.name, p.price, p.qty, (p.price * p.qty).toFixed(2)])),
                    [{ text: 'Total Amount', colSpan: 3 }, {}, {}, this.invoice.products.reduce((sum, p) => sum + (p.qty * p.price), 0).toFixed(2)]
                ]
            }
        }
    ],
    // Common Styles
}
Table property has the following properties
headerRows: this property specifies the no. of starting rows of the body is header row. Header rows will be repeated when a table is continued on the second page.widths: using this property we can assign the width for each column. we can use *, auto, and fixed number as width.body: this property contains the list of rows in array form. where each inner array represents the cell array of that row.We can add the QR Code in a row with qr property as shown below, In our application, QR Code will be generated from customerName.
let docDefinition = {
    content: [
        // Previous Configuration
        {
            columns: [
                [{ qr: `${this.invoice.customerName}`, fit: '50' }],
                [{ text: 'Signature', alignment: 'right', italics: true }],
            ]
        },
    ],
    // Common Styles
} We can add the unordered and ordered list in PDF with ul and ol property of PDFMake document definition object. We will create a terms and conditions list as below,
let docDefinition = {
    content: [
        // Previous Configuration
        {
            ul: [
              'Order can be return in max 10 days.',
              'Warrenty of the product will be subject to the manufacturer terms and conditions.',
              'This is system generated invoice.',
            ],
        }
    ],
    // Common Styles
}
Great ✨✨✨ We are done with Invoice Generator Implementation.
Check out the final source code: Angular PDFMake Invoice Generator Repository
If you feel this application is useful to you, give us a ⭐ on GitHub.
Check out the live running application: Angular PDFMake Invoice Generator
In this article, we have discussed the various approaches to generating a PDF in an application. We have implemented the Invoice Generator application to demonstrate client-side pdf generation in angular with pdfmake.
I hope you like this article. Give your valuable feedback and suggestions in the below comment section.
This article was original published at C# Corner : Client Side PDF Generation in Angular with PDFMake
Charts help us to visualize large amounts of data in an easy-to-understand and interactive way. …
Web Page title, description, and other meta tags are very important for the Search Engine…
Google Analytics is a popular analytical tool for web and mobile applications from Google. It…
Chrome DevTools provides amazing features to debug source code, capture element state, update and test…
Angular Charts Series Articles Best Angular Chart Libraries How to use ngx-charts in angular application…
Angular Charts Series Articles Best Angular Chart Libraries How to use ngx-charts in angular application…